Battle of Hastings
From Wikipedia, the free encyclopedia
|
|
This article includes a list of references or external links, but its sources remain unclear because it lacks inline citations. Please improve this article by introducing more precise citations where appropriate. (August 2008) |
|
|
This article needs additional citations for verification. Please help improve this article by adding reliable references (ideally, using inline citations). Unsourced material may be challenged and removed. (August 2007) |
| The Battle of Hastings | |||||||
|---|---|---|---|---|---|---|---|
| Part of the Norman Conquest | |||||||
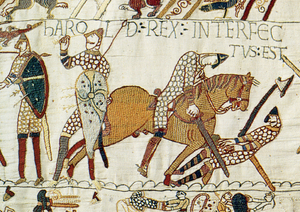 Death of Harold in the Battle of Hastings, as shown on the Bayeux Tapestry |
|||||||
|
|||||||
| Belligerents | |||||||
| Normans supported by: Bretons (one third of total), Flemings, French |
Anglo-Saxons, the Þingalið |
||||||
| Commanders | |||||||
| William of Normandy, Odo of Bayeux |
Harold Godwinson † | ||||||
| Strength | |||||||
| 8,400 (2,200 cavalry, 1,700 archers, 4,500 men-at-arms) |
7,500 (2,000 housecarls, 5,500 fyrd) |
||||||
| Casualties and losses | |||||||
| Around 3,000 killed | Around 5,000 killed | ||||||
The Battle of Hastings (14 October 1066) was the decisive Norman victory in the Norman Conquest of England. It was fought between the Norman army of William the Conqueror, and the English army led by Harold Godwinson.[1] The battle took place at Senlac Hill, approximately 6 miles north-west of Hastings.
The Norman army was estimated to number as many as 8,400 and consisted of at the most 2,200 cavalry, 4,500 infantry and 1,700 archers and crossbowmen. William's strategy relied on archers to soften the enemy, followed by a general advance of the infantry, and then a cavalry charge. The Norman army was composed of nobles, mercenaries, and troops from France and Europe, including some from southern Italy. The English army is usually thought to have numbered roughly 7,500 and consisted entirely of infantry. It is most probable that all the members of the army rode to battle, but once at the appointed place they dismounted to fight on foot.
The battle was a decisive Norman victory. Harold II was killed; traditionally, it is believed he was shot through the eye with an arrow. Although there was further English resistance, this battle is seen as the point at which William gained control of England.
The famous Bayeux Tapestry depicts the events before and during the battle. An abbey, known as Battle Abbey, was subsequently built on the site of the conflict.
Contents |
[edit] Background
Harold belonged to the most powerful family in England; he claimed the throne of England for himself in January 1066, soon after Edward the Confessor died. He secured the support of the Witenagemot for his accession. Some sources say that while Edward had promised the throne to his cousin William, on his deathbed he decided to confer it to Harold instead. Edward the Confessor had a nephew though, but he couldn't become king because he was too young to protect himself, let alone a country.
Duke William of Normandy held fast to his claim to the throne. He took Harold's crowning as a declaration of war. William had been establishing policy in England for over 15 years, and was not ready to give up his position so easily. He planned to invade England, and take the crown for himself. The initial difficulty was that the Norman army was not powerful enough, so nobles as far as southern Italy were called to convene at Caen, in Normandy. There, William promised land and titles to his followers and that the voyage was secured by the Pope himself. William assembled a fleet of around 700 ships - a staggering logistical feat - and sailed for England.
On 28 September 1066, William, after being delayed by a storm in the English Channel, asserted his claim to the English crown by military force, landing unopposed at a marshy, tidal inlet at Bulverhythe, currently part of western Hastings.[citation needed] The beachhead is within 2 miles of the Senlac battlefield, is sheltered, and has access to high ground, whilst Pevensey, which had long been held to be the Duke's landing place, is marsh-bound—presenting problems for landing troops, horses and stores, and remote from the road to London.
Upon hearing the news of the landing of the Duke's forces, the English King, Harold II, who had just annihilated an invading Norwegian Viking army under King Harald Hardråda and Tostig Godwinson (Harold's brother) at the Battle of Stamford Bridge, near York, hurried southward to meet the invaders. His brother, Earl Gyrth urged a delay while more men could be assembled, but Harold was determined to show his people that he could defend his new kingdom decisively against every invader. He departed London on the morning of 12 October, gathering what available forces he could on the way. After camping at Long Bennington, he arrived at Senlac Hill the night of 13 October.[2]
Harold deployed his force, astride the road from Hastings to London, on Senlac Hill some 6 miles inland north-west of Hastings. Behind him was the great forest of Anderida (the Weald), and in front, the ground fell away in a long glacis-like slope, which at the bottom rose again as the opposing slope of Telham Hill.
[edit] The English army
The English army is usually thought to have been around 7,500 strong, and consisted entirely of Spearmen and Houscarls. It is most probable that all the members of the army rode to battle, but once at the appointed place they dismounted to fight on foot.
The English army had fought a major battle at Stamford Bridge in Yorkshire less than three weeks earlier, which may have affected its battleworthiness at Hastings.
The core of the English army was made up of full-time professional soldiers called Housecarls. They had a long-standing dedication to the King, and would fight to the last man if necessary. Their armour consisted of a conical helmet, a chain mail hauberk, and they carried a circular shield. Their primary weapon was the Danish battleaxes which they wielded with two hands, although every man would have carried a sword as well.
The bulk of the army, called the fyrd, comprised part-time English soldiers drawn from the landowning minor nobility. These thegns were the land-holding aristocracy of pre-conquest England and were required to serve with their own armour and weapons for a certain number of days each year. The Victorian concept of the Noble Peasant defending his lands with a pitchfork has been relentlessly quashed by modern archaeological research.
The most formidable defence of the English was the shield wall, in which all the men on the front ranks locked their shields together. In the early stages of the battle, the shield wall was very effective at defending against the Norman archery barrages. The entire army took up position along the ridge-line; as casualties fell in the front lines the rear ranks would move forward to fill the gaps.[2]
[edit] The Norman army
The Norman army was estimated to be as high as 8,400 strong and consisted of, at the most, 2,200 cavalry, 4,500 infantry and 1,700 missile troops (archers and crossbowmen). William's strategy relied on archers to soften the enemy, followed by a general advance of the infantry and then a cavalry charge. The Norman army was made up of nobles, mercenaries, and troops from France to as far as southern Italy.
The Norman army's power derived from its cavalry which were reckoned amongst the best in Europe. They were heavily armoured, and usually had a lance and a sword. As with all cavalry, they were generally at their most effective against troops whose formation had begun to break up.
Apart from the missile troops, the Norman infantry were probably protected by chain mail and armed with spear, sword and shield, like their English counterparts.
The inclusion of large numbers of missile troops in William's army reflected the trend in other European armies for composite forces who combined on the battlefield. The bow was a relatively short weapon with a short draw, but was effective on the battlefield at this time. Hastings also marks the first known use of the crossbow in English history.
[edit] The Battle
William relied on a basic strategy with archers in the front rank weakening the enemy with arrows, followed by infantry which would engage in close combat, and finally culminating in a cavalry charge that would break through the English forces. However, his strategy did not work as well as planned. William's army attacked the English as soon as they were ready and formed up. The Norman archers opened fire with several volleys, but many of the arrows hit the shield wall and had very little effect. Believing the English to have been softened up, William ordered his infantry to attack. As the Normans charged up the hill, the English threw down whatever they could find: stones, javelins, maces. The barrage inflicted heavy casualties amongst the Norman ranks, causing the lines to break up.
The infantry charge reached the English lines, where hand-to-hand fighting of very heavy ferocity took place. William had expected the English to be faltering, but something was going wrong. The arrow barrage had little to no effect, and nearly all the English troops still stood, their shield wall intact. As a result, William had to order his cavalry charge far sooner than planned. Despite their careful breeding and training, faced with a wall of axes, spears and swords, many of the horses simply shied away. After about an hour of fighting, the Breton division on William's left faltered and broke completely, fleeing down the hill. Suffering heavy casualties, and realising they would be quickly outflanked, the Norman and Flemish divisions retreated along with the Bretons. Unable to resist the temptation, many of the English broke ranks, including hundreds of fyrdmen and Harold's brothers, Leofwyne and Gyrthe. In the following confused fighting, William's horse was killed from underneath him, and he toppled to the ground. Witnessing the apparent death of their leader, the Normans panicked and took to flight. However, William took off his helmet to show he was alive and rallied his army.
William and a group of knights attacked the pursuing, now dispersed English, who were no longer protected by the shield wall, and cut down large numbers of fyrdmen. Many did not recognise the Norman counter-attack until it was too late, but some did manage to scramble back up the hill to the safety of the housecarls; others, including Harold's brothers, were not so fortunate. The two armies formed up, and a temporary lull fell over the battle. William took advantage of this lull to ponder a new strategy. The Normans' near-rout had turned to William's advantage, since the English lost much of the protection provided by the shield wall. Without the cohesion of a disciplined, strong formation, the individual English were easy targets. Keeping this in mind, William launched his army at the strong English position yet again. What happened next is open to debate. Some historians state that the Normans attempted several feint retreats, but this seems unlikely, as it would have inflicted too heavy casualties and would have been very complicated to carry out. The strategy worked either way, and many of the English housecarls were killed.
With a large number of English fyrdmen now holding the front rank, the disciplined shield wall that the housecarls had maintained began to falter and this presented an interesting opportunity to William. At the start of the battle, William's bowmen had fired directly into the English force, and the hail of arrows was thus ineffective because of their shields. Though many on the front ranks still had shields, William ordered his archers to fire directly over the shield wall, so their arrows landed in the clustered rear ranks of the English army. The archers did this, and with great success. Legend states that it was at this point that Harold was hit in the eye by an arrow, though that is speculated from a scene in the Bayeux Tapestry. Many of the English were now weary, and lost the discipline of the shield wall. William's army attacked again, and managed to make small chinks in the shield wall. They were able to exploit these gaps, and the English army began to fragment. William and a handful of knights broke through the wall, and struck down the English king. Without their leader, and many of the nobles now killed, hundreds of fyrdmen fled the field. The housecarls kept their oath of loyalty to the king, and fought bravely until they were all killed.
The bodies were cleared from the battlefield, William's tent pitched and a celebratory dinner held. Though casualties are entirely speculative, it seems likely that around 5,000 English and 3,000 Normans were killed during the battle.[original research?][citation needed]
[edit] Aftermath

Only a remnant of the defenders made their way back to the forest. Some of the Norman forces pursued the English but were ambushed and destroyed in the dusk when they ran afoul of steep ground, called, in later (12th century) sources, "the Malfosse", or "bad ditch".[citation needed] William rested his army for two weeks near Hastings, waiting for the English lords to come and submit to him. Then, after he realised his hopes of submission at that point were in vain, he began his advance on London. His army was seriously reduced in November by dysentery, and William himself was gravely ill. However, he was reinforced by fresh troops crossing the English Channel. After being thwarted in an attempt to cross London Bridge, he approached the city by a circuitous route, crossing the Thames at Wallingford and advancing on London from the north-west.
The northern earls, Edwin and Morcar, Esegar the sheriff of London, and Edgar the Atheling, who had been elected king in the wake of Harold's death, all came out and submitted to the Norman duke before he reached London. William was crowned king on Christmas Day, 1066 at Westminster Abbey.
[edit] Legacy
- See also: Norman conquest of England#Significance.

Battle Abbey was built on the site of the battle. A plaque marks the place where Harold is believed to have fallen and the location where the high altar of the church once stood. The settlement of Battle, East Sussex, grew up around the abbey and is now a small market town.
The Bayeux Tapestry depicts the events before, during, and after the Battle of Hastings.
The Battle of Hastings is an excellent example of the application of the theory of combined arms. The Norman bowmen, cavalry and infantry cooperated together to deny the English the initiative, and gave the homogeneous English army few tactical options except defence.
Nevertheless, it is quite likely that this tactical sophistication existed primarily in the minds of the Norman chroniclers. The account of the battle given in the earliest source, the Carmen de Hastingae Proelio, is one where the Norman advance surprises the English, who manage to gain the top of Senlac Hill before the Normans. The Norman light infantry is sent in while the English are forming their shield wall (to no avail) and then the main force was sent in (no distinction being made between infantry and cavalry).
Succeeding sources include (in chronological order) William of Poitiers's Gesta Guillelmi (written between 1071 and 1077), The Bayeux Tapestry (created between 1070 and 1077), and the much later Chronicle of Battle Abbey, the chronicles written by William of Malmesbury, Florence of Worcester, and Eadmer's Historia Novorum in Anglia embellishes the story further, with the final result being a William whose tactical genius was at a high level—a level that he failed to display in any other battle.
The Battle of Hastings also had a tremendous influence on the English language, introducing many French words that started in the nobility and eventually became part of the English language itself.
As Paul K. Davis writes, "William’s victory placed a foreign ruler on the throne of England, introducing European rather than Scandinavian society onto the isolated island" in "the last successful invasion of England."[3]
[edit] See also
[edit] References
[edit] Notes
- ^ In this article dates before 14 September 1752 are in the Julian calendar, later dates are in the Gregorian calendar.
- ^ a b Howarth. page 165.
- ^ Paul K. Davis, 100 Decisive Battles from Ancient Times to the Present: The World’s Major Battles and How They Shaped History (Oxford: Oxford University Press, 1999), 113.
[edit] Bibliography
- Howarth, David (1993), 1066: The Year of the Conquest, New York: Barnes and Noble
- Douglas, Daniel C. (1964), William the Conqueror, Berkeley, CA: University of California Press
- Gravett, Christopher, Hastings 1066, The Fall of Saxon England; Osprey Campaign Series #13, Osprey Publishing, 1992
- Morton, Catherine and Muntz, Hope (eds). The Carmen de Hastingae Proelio of Guy Bishop of Amiens, Oxford at the Clarendon Press 1972.
[edit] Articles
- The Battle of Hastings (including army strengths)
- Anglorum, Regia. The Battle of Hastings
- Beck, Steven. The Battle of Hastings armies, weapons and battle strategy.
- Crack, Glen Ray. 10 January, 1998 The Battle of Hastings, 1066 (1998-2007)
- Grout, James. The Battle of Hastings Encyclopedia Romana
- Larsen, Douglas. The Bayeux Tapestry, primary source for the Battle of Hastings uses the Bayeaux Tapestry as a primary source of information.
- Larsen, Douglas. My Battle of Hastings: 14 Oct 1066, website www.1066.us. An extensive website on the battle, with an emphasis on wargaming simulation.
- Murrt, Steven J. The Battle of Hastings, website www.dot-domesday.me.uk. Contemporary accounts of the Battle of Hastings.
- Origins of the conflict, the battle itself and its aftermath BBC History website
- Poyntz-Wright, Peter. "Hastings" In-depth book on the Battle of Hastings.
- Staff. "Information on the Battle of Hastings", website of www.battle-of-hastings-1066.org.uk. Includes facts and full story.
- William of Malmesbury's Account.[1]
[edit] Re-enactments
- Snow, Dan. The Battle of Hastings Re-enacted. A short documentary film made for English Heritage.
- Battle of Hastings re-enactment page
|
||||||||||||||||||||

