Battle of Britain
From Wikipedia, the free encyclopedia
| Battle of Britain | |||||||
|---|---|---|---|---|---|---|---|
| Part of Second World War | |||||||
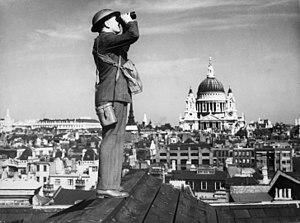 An Observer Corps spotter scans the skies of London. |
|||||||
|
|||||||
| Belligerents | |||||||
| Commanders | |||||||
| Strength | |||||||
| 1,963 aircraft[nb 1] | 4,074 aircraft[nb 2] | ||||||
| Casualties and losses | |||||||
| 544 killed[4][5].[6] 1,547 aircraft destroyed[nb 3] |
2,500 killed[citation needed] 1,887 aircraft destroyed[nb 4] |
||||||
| 59,588 civilian casualties[nb 5] | |||||||
| 1 The RAF was the only sovereign Allied Air Force, the Polish Air Force was not given sovereignty until June 1944[7] | |||||||
|
|||||
The Battle of Britain (German: Luftschlacht um England) is the name given to the sustained strategic effort by the German Air Force (Luftwaffe) during the summer and autumn of 1940 to gain air superiority over the Royal Air Force (RAF), especially Fighter Command. The name derives from a speech made on 18 June 1940 in the House of Commons by Prime Minister Winston Churchill. He said: "The Battle of France is over. I expect the Battle of Britain is about to begin..."[8]
The Battle of Britain was the first major campaign to be fought entirely by air forces. It was the largest and most sustained bombing campaign attempted up until that date. The failure of Nazi Germany to reach its objectives—to destroy Britain's air defence or to force Britain out of the war by forcing an armistice or surrender—is considered both its first major defeat and a crucial turning point in the war.[9] Germany's plan was to gain air superiority, then launch Operation Sealion: amphibious and airborne invasion of Britain. Initially RAF airfields were attacked. As the Battle progressed, operations were extended to the strategic level: systematic destruction of aircraft production centres and ground infrastructure. Eventually the Luftwaffe and the RAF resorted to attacking areas of political significance and terror bombing tactics.[10]
British historians date the battle from 10 July to 31 October 1940, which represented the most intense period of daylight bombing. German historians usually place the beginning of the battle in mid-August 1940 and end it in May 1941, on the withdrawal of the bomber units in preparation for Operation Barbarossa, the Campaign against the USSR on 22 June 1941.
Contents |
[edit] Background
Attacks by the Luftwaffe on Britain began with raids on naval targets, with bombers being shot down over the Firth of Forth on 16 October 1939 and over Scapa Flow on the following day, but there were no major attacks during the Phoney War period, a lull in fighting that Hitler ended on 10 May 1940 with his invasion of the Low Countries.[11]
Following the evacuation of the British from Dunkirk (Operation Dynamo), and the French surrender on 22 June 1940, Hitler believed the war was practically over and the British, defeated on the continent and without European allies, would quickly come to terms with Germany.[12] Although there was an element of British public and political sentiment favouring negotiated peace with a clearly ascendant Germany – among them the Foreign Secretary, Lord Halifax – the recently-installed Churchill nonetheless refused to consider an armistice with Hitler's Germany.[13] Churchill's skillful use of rhetoric hardened public opinion against a peaceful resolution and prepared the British for a long war.
On 16 July, in an effort to finish the war in the west, Hitler ordered the rapid preparation of a plan to invade Britain.[14]Hitler hoped to frighten Britain into peace using the preparations as a means to apply pressure. Prior to this, on 11 July, Admiral Raeder had told Hitler invasion could only be contemplated as a last resort, and only then with full air superiority. The Kriegsmarine had been nearly crippled during the Norwegian Campaign, with many of its ships having been sunk or damaged, while the Royal Navy had over 50 destroyers, 21 cruisers and eight battleships in the British Home Fleet.[15][16] However, it is often overlooked that the Royal Navy had lost six destroyers, with a further 23 damaged and put out of service during the Dunkirk evacuation,[17] leaving the Home Fleet with just 21 destroyers for nearly six weeks. Even so, there was little the weakened Kriegsmarine could do to stop the Royal Navy intervening against the invasion. The only alternative was to use the Luftwaffe's dive bombers, which required air superiority in order to operate effectively. Although Hitler agreed with Raeder, he nevertheless ordered all services to make preparations for an amphibious assault once air superiority had been achieved.[18]
The plan was prepared by OKW. The operation, code-named Seelöwe ("Sealion"), was scheduled for mid-September 1940 and called for landings on the south coast of Great Britain, backed by an airborne assault. All preparations were to be made by mid August.
Neither German Führer Adolf Hitler nor his High Command of the Armed Forces (Oberkommando der Wehrmacht, or OKW) believed it possible to carry out a successful amphibious assault on Britain until the RAF had been neutralised. Some historians, such as Derek Robinson, have argued that an invasion could not have succeeded as the massive superiority of the Royal Navy over the German Navy (Kriegsmarine) would have made Sealion a disaster and the Luftwaffe would have been unable to prevent decisive intervention by British cruisers and destroyers, even with air superiority.[19][20] This perspective is shared by Grossadmiral Karl Dönitz, who believed air superiority was "not enough". Dönitz believed, "we possessed neither control of the air or the sea; nor were we in any position to gain it".[21] Grossadmiral Erich Raeder, Commander-in-Chief of the Kriegsmarine at the time, was more optimistic, believing that the Luftwaffe, with air superiority, might enable a successful landing. He maintained it would be a very risky operation and required "absolute mastery over the Channel by our air forces".[22]
[edit] Opposing forces
- For more details on this topic, see RAF Fighter Command Order of Battle 1940 and Luftwaffe Order of Battle August 1940.
The Luftwaffe was facing a more capable opponent than it had met before: a sizeable, highly-coordinated, well-supplied air force, fielding aircraft able to match the German Messerschmitt Bf 109E and Bf 110C. The majority of the RAF's fighting would rest upon the workhorse Hurricane Mk I. The performance of the Spitfire Mk I over Dunkirk came as a surprise to the Jagdwaffe, although there was a strong belief that in the 109 they had a superior fighter.[23]
[edit] Aircraft: fighters
The Bf 109E was superior to the Hurricane; it had a better climb rate and was up to 30 to 40 mph faster. The Hurricane could, however, turn more tightly than either the 109 or the Spitfire. The Bf 109E and the Spitfire, in certain key areas, had advantages over each other. At some altitudes, the 109 could out-climb the British fighter.
In truth the differences between the Spitfire and the Me 109 in performance and handling were only marginal, and in a combat they were almost always surmounted by tactical considerations: which side had seen the other first, had the advantage of sun, altitude, numbers, pilot ability, tactical situation, tactical co-ordination, amount of fuel remaining, etc[24]
The Bf 109 was also used as a fighter-bomber - the E-4/B and E-7 models had the ability to carry a 250 kg bomb underneath the fuselage. The Bf 109, unlike the Stuka, could, after releasing its ordnance, fight on equal terms with RAF fighters.[25][26]

At the start of the battle, the twin-engine Messerschmitt Bf 110 long range "Destroyer" (Zerstörer) was also expected to engage in air-to-air combat while escorting the Luftwaffe bomber fleet. Although the 110 was faster than the Hurricane and almost as fast as a Spitfire, its lack of manoeuvrability and acceleration meant that it failed in its role as a long-range escort fighter. The most successful role of the 110 during the Battle was as a schnellbomber (fast bomber). One unit, Erprobungsgruppe 210 proved that the Bf 110 could be used to good effect in attacking small or "pinpoint" targets[27]
The Boulton-Paul Defiant had some initial successes over Dunkirk[28] against Luftwaffe fighters which attacked from the rear because of its resemblance to the Hurricane. However, during the battle this single engined two seater proved to be hopelessly outclassed by the Jagdwaffe. For various reasons the Defiant lacked any form of forward firing armament and the heavy turret meant that it was unable to out-run or out- manoeuvre either the Bf 109 or the Bf 110. By the end of August, after taking disastrous losses, the aircraft was withdrawn from daylight service.[29][30]
There has been some criticism of the decision to keep these aircraft (along with the Fairey Battle in Bomber Command) operational instead of retiring and scrapping them, allowing their Merlin engines to be turned over to fighters and their pilots (about three thousand in all) to be retrained on Hurricanes, thereby freeing large numbers of high-time, combat-experienced Hurricane pilots for Spitfires.[30]
[edit] Aircraft: bombers
The Luftwaffe's four primary bombers were, by type of attack, the Heinkel He 111, Dornier Do 17, and Junkers Ju 88 for level bombing, and for diving attacks, the specialist Junkers Ju 87 Stuka. The Heinkel He 111 was used in greater numbers than the others during the conflict and is more well known, partly due to its distinctive wing shape. Each of the level bombers also had a few reconnaissance versions that were used during the battle.[31]
Although successful in previous Luftwaffe engagements, in the Battle of Britain the Ju 87 suffered prohibitive losses because of its slow speed and vulnerability to fighter interception. As a result of heavy losses on 18 August the Ju 87s were withdrawn from the battle. The remaining three bomber types differed in their capabilities: The Heinkel 111 was the slowest, the Ju 88, once its mainly externally carried bomb load was dropped, was the fastest, and the Do 17 had the smallest bomb load.[31]
All three bomber types suffered heavy losses from British fighters but the Ju 88 disproportionately so.
Later in the conflict when night bombing became more frequent, all three level bombers were put to use. However, due to its reduced bomb load, the lighter Do 17 was used less than the He 111 and Ju 88 for this purpose.
On the British side three bombers were mostly used on night operations against targets such as factories, invasion ports and railway centres; the Armstrong Whitworth Whitley, the Handley-Page Hampden and the Vickers Wellington were classified as heavy bombers by the RAF although the Hampden was, in reality, a medium bomber comparable to the He 111. The twin engined Bristol Blenheim and the single engined Fairey Battle were both light bombers; the Blenheim was the most numerous of the aircraft equipping Bomber Command and was used in attacks against shipping, ports, airfields and factories on the continent by day and by night; the Battle was rarely used on operations.
[edit] Pilots
Prior to the war, the RAF's processes for selecting potential candidates were more concerned with social standing than actual aptitude.[32] . By summer 1940, there were over 9,000 pilots in the RAF for approximately 5,000 aircraft, the majority of which were bombers.[citation needed]However, the problem of pilot shortage was self-inflicted, due to inefficiencies in training and assignment. With aircraft production running at 300 each week, only 200 pilots were being trained in the same period. In addition, more pilots were allocated to squadrons than there were aircraft. Another problem was that only about 30% of the 9,000 pilots were assigned to operational squadrons; 20% of the pilots were involved in conducting pilot training, and a further 20% were undergoing further instruction, like those offered in Canada to the Commonwealth trainees, although already qualified. The rest were assigned to staff positions since, RAF policy dictated that only pilots could make many staff and operational command decisions, even in engineering matters. At the height of fighting, and despite Churchill's insistence, only 30 pilots were released to the front line from administrative duties.[33] For these reasons, the RAF had fewer experienced pilots at the start of the battle, and it was the lack of trained pilots in the fighting squadrons, rather than the lack of aircraft, that became the greatest concern for Dowding. Drawing from regular RAF forces as well as the Auxiliary Air Force and the Volunteer Reserve, the British could muster a total of some 1,103 fighter pilots on 1 July. Replacement pilots, with little actual flight training and often no gunnery training whatsoever, suffered high casualty rates.[34]
The Luftwaffe could muster more fighter pilots, 1,450, mostly due to more efficient training, [33] who were more experienced overall. Drawing from a cadre of Spanish Civil War veterans, they had comprehensive courses in aerial gunnery, as well as instructions in tactics suited for fighter versus fighter combat.[35] Luftwaffe training manuals also discouraged heroism, stressing the utmost importance of attacking only when the odds were in the pilot's favour.
[edit] International participation
Both sides received significant outside support during the battle.
[edit] Allied side
The Royal Air Force roll of honour for the Battle of Britain recognises 595 non-British pilots (out of 2,936) as flying at least one authorised operational sortie with an eligible unit of the RAF or Fleet Air Arm between 10 July and 31 October 1940.[36][37]

This included 145 Poles, 127 New Zealanders, 112 Canadians, 88 Czechoslovakians, 28 Belgians, 32 Australians, 25 South Africans, 13 French, 7 American, 10 Irish, and single figures from Jamaica, the British Mandate of Palestine, and Southern Rhodesia. [38]
[edit] Axis side
An element of the Italian Royal Air Force (Regia Aeronautica) deployed in support of the German Air Force (Luftwaffe) during the Battle of Britain. This expeditionary force was called the Italian Air Corps (Corpo Aereo Italiano or CAI) and first saw action in late October 1940. It took part in the latter stages of the battle but achieved limited success. The unit was redeployed in early 1941.
[edit] Air combat tactics
In the late 1930s, Fighter Command were not expecting to be facing single-engine fighters over Britain, only bombers. With this in mind, a series of "Fighting Area Tactics" were formulated and rigidly adhered to, involving a series of manoeuvres designed to concentrate a squadron's firepower to bring down bombers: with no apparent prospect of escorting fighters to worry about, RAF fighter pilots flew in tight, vee-shaped sections ("vics") of three. These restricted squadrons to tight 12 aircraft formations composed of four sections in another tight "V". With this formation, only the squadron leader at the front was free to actually watch for the enemy; the other pilots had to concentrate on keeping station.[39] RAF fighter training also emphasised by-the-book attacks by sections breaking away in sequence. Fighter Command recognised the weaknesses of this rigid structure early in the battle, but it was felt too risky to change tactics in the midst of the battle, because replacement pilots, often with only minimal actual flying time, could not be readily retrained,[40] and inexperienced RAF pilots needed firm leadership in the air only rigid formations could provide.[41] German pilots dubbed the RAF formations Idiotenreihen ("rows of idiots") because they left squadrons vulnerable to attack.[34][42] Front line RAF pilots were acutely aware of the inherent deficiencies of their own tactics. A compromise was adopted whereby squadron formations used much looser formations with a one or two "weavers" flying independently above and behind to provide increased observation and rear protection; these tended to be the least experienced men and were often the first to be shot down without the other pilots even noticing that they were under attack.[34][43] During the battle, 74 Squadron under Squadron Leader Adolph Malan adopted a variation of the German formation called the "fours in line astern", which was a vast improvement on the old three aircraft "vic." In 1941, Squadron Leader Douglas Bader, then commanding 242 Squadron but often leading the Duxford Wing, devised the "finger four".[44] Malan's formation was later generally used by Fighter Command.[45]
The Luftwaffe employed a loose section of two, based on a leader (Rottenführer) followed at a distance of about 183 meters (200 yards)[nb 6] by his wingman (nicknamed the Rottenhund or Katschmareks), who also flew slightly higher and was trained to stay with his leader at all times. While the leader was free to search for enemy aircraft, and could cover his wingman's blind-spots, his wingman was able to concentrate on searching the airspace in the leader's blind-spots, behind and below. Any attacking aircraft could be sandwiched between the two 109s.[46]
In the Luftwaffe formations, the pair allowed the Rottenführer to concentrate on getting kills. This latter aspect, however, caused some grievances in the lower ranks because it was felt that the high scores of some Rottenführer came at the expense of the Katschmareks. During the Battle of Britain, a pilot who shot down 20 aircraft was automatically awarded the Ritterkreuz (Knight's Cross), to which was added the Oak Leaves, Swords and Diamonds for each additional 20 aircraft. Those pilots who appeared to have a chronic desire for these awards were said to be suffering from Halsweh (a sore throat). Few wingmen in Luftwaffe fighter formations were able to shoot down opposing aircraft, while their formation leaders were scoring heavily.[47]
Two of these sections were usually teamed up into a Schwarm, where all of the pilots could watch what was happening around them. Each Schwarm in a Staffel flew at staggered heights and with 183 meters (200 yards) of room between them, making the formation difficult to spot at longer ranges and allowing for a great deal of flexibility. [35] By utilising a tight "cross-over" turn, a Schwarm could quickly change direction.[46] This formation was developed based on principles dating to Oswald Boelcke in 1916. The Finnish Air Force, from 1934 on, adopted similar formations, called partio (patrol; two aircraft) and parvi (two patrols; four aircraft), [48] for comparable reasons, though Luftwaffe pilots (led by Günther Lützow and Werner Mölders among others, during the Spanish Civil War) are generally given credit.
The biggest disadvantage faced by Bf 109 pilots was that without the benefit of long-range drop tanks (which were introduced in very limited numbers in the late stages of the battle), usually of 300 litre (79 US gallon) capacity, the 109s had an endurance of just over an hour. Once over Britain, a 109 pilot had to keep an eye on a red "low fuel" light on the instrument panel: once this was illuminated, he was forced to turn back and head for France. With the prospect of two long over-water flights, and knowing their range was substantially reduced when escorting bombers or in the event of combat, the Jagdflieger coined the term Kanalkrankheit or "Channel sickness".[49]
The 110 fighter units adopted the same "finger-four" formation as the 109 units, but were seldom able to use this to the same advantage. When faced with attack, Zerstörergruppen increasingly resorted to forming large "defensive circles", in which each 110 guarded the tail of the aircraft ahead of it. These conspicuous formations were often successful in attracting RAF fighters, which were themselves sometimes "bounced" by high-flying 109s. This led to the often repeated myth that the 110s were being escorted by 109s. The 110's most successful method of attack was the "bounce" from above. As a Schnellbomber, the 110 usually used a shallow dive to bomb the target and was able to escape at high speed.[27] [50]
[edit] Luftwaffe strategy

The Luftwaffe was devised as a tactical weapon to support the Army on the battlefield. During the blitzkrieg offensives against Poland, Denmark and Norway and France and the Low Countries, the Luftwaffe had co-operated fully with the Wehrmacht. For the Battle of Britain however, the Luftwaffe had to operate in a strategic role, something for which it was unsuited. Its main task was to ensure air supremacy over southeast England, to pave the way for an invasion fleet.
The Luftwaffe regrouped after the Battle of France into three Luftflotten (Air Fleets) on Britain's southern and northern flanks. Luftflotte 2, commanded by Generalfeldmarschall Albert Kesselring, was responsible for the bombing of southeast England and the London area. Luftflotte 3, under Generalfeldmarschall Hugo Sperrle, targeted the West Country, Midlands, and northwest England. Luftflotte 5, led by Generaloberst Hans-Jürgen Stumpff from his headquarters in Norway, targeted the north of England and Scotland. As the battle progressed, command responsibility shifted, with Luftflotte 3 taking more responsibility for the nighttime Blitz attacks while the main daylight operations fell upon Luftflotte 2's shoulders.

Initial Luftwaffe estimates were that it would take four days to defeat Fighter Command in southern England. This would be followed by a four-week offensive during which the bombers and long-range fighters would destroy all military installations throughout the country and wreck the British aircraft industry. The campaign was planned to begin with attacks on airfields near the coast, gradually moving inland to attack the ring of sector airfields defending London. Later reassessments gave the Luftwaffe five weeks, from 8 August to 15 September, to establish temporary air superiority over England.[51] To achieve this goal Fighter Command had to be destroyed, either on the ground or in the air, yet the Luftwaffe had to be able to preserve its own strength in order to be able to support the invasion; this meant that the Luftwaffe had to maintain a high "kill ratio" over the RAF fighters. The only alternative to the goal of air superiority was to be a terror bombing campaign aimed at the civilian population, but this was considered to be a last resort and it was expressly forbidden by Hitler.[51]
The Luftwaffe kept broadly to this scheme, but its commanders had differences of opinion on strategy. Sperrle wanted to eradicate the air defence infrastructure by bombing it. His counterpart, Kesselring, championed attacking London directly—either to bombard the British government into submission or to draw RAF fighters into a decisive battle. Göring did nothing to resolve this disagreement between his commanders, and only vague directives were set down during the initial stages of the battle, with Göring seemingly unable to decide upon which strategy to pursue.[52] He seemed at times obsessed with maintaining his own power base in the Luftwaffe and indulging his outdated beliefs on air fighting, which were later to lead to tactical and strategic errors.
[edit] Tactics

The Luftwaffe consistently varied its tactics in its attempts to break through the RAF defences. It launched many free-roving fighter sweeps, known as Freie Jagd ("Free Hunts"), to draw up RAF fighters. RAF fighter controllers, however, were often able to detect these and position squadrons to avoid them, keeping to Dowding's plan to preserve fighter strength for the bomber formations. The Luftwaffe also tried using small formations of bombers as bait, covering them with large numbers of escorts. This was more successful, but escort duty tied the fighters to the bombers' slow speed and made them more vulnerable.
By September, standard tactics for raids soon became an amalgam of techniques. A Frei Jagd, or fighter sweep would precede a raid to try to sweep any defenders out of the raid's path. The bombers would then fly in at altitudes between 16,000 and 20,000 feet (6,100 m), closely escorted by fighters. Escorts were divided into two parts, some operating in close contact with the bombers, and other a few hundred yards away and a little above. If the formation was attacked from the starboard the starboard section engaged the attackers, the top section moving to starboard and the port section to the top position. If the attack came from the port side the system was reversed. British fighters coming from the rear were engaged by the rear section and the two outside sections similarly moving to the rear. If the threat came from above, the top section went into action while the side sections gained height in order to be able to follow RAF fighters down as they broke away. If attacked themselves, all sections flew in defensive circles. These tactics were skillfully evolved and carried out, and were extremely difficult to counter.[53]
Luftwaffe tactics were influenced by their fighters, which were divided into single-engined Bf 109s and twin-engine Bf 110s. The Bf 110 Zerstörer ("destroyer") proved too vulnerable to the nimble single-engined RAF fighters, losing 13 and 30 aircraft on the 13 and 15 August, the equivalent of an entire Gruppe, and the type's worst losses during the campaign.[54] This trend continued with a further eight and 15 lost on 16 and 17 August.[55] Göring thus ordered the Bf 110 units to operate "where the range of the single-engined machines were not sufficient". Furthermore, he ordered that defensive circles were to be renamed "offensive circles", in a vain bid to improve rapidly declining morale.[56]
This meant the bulk of fighter duties fell on the Bf 109. Fighter tactics were then complicated by bomber crews who demanded closer protection. Due to similar concerns over losses in the hard-fought battles of 15 August and 18 August, Göring ordered an increase in close escort duties. This decision shackled many of the Bf 109s to the bombers and, although they were more successful at protecting the bomber forces, casualties amongst the fighters mounted primarily because they were forced to fly and manoeuvre at reduced speeds.
Adolf Galland noted:

We had the impression that, whatever we did, we were bound to be wrong. Fighter protection for bombers created many problems which had to be solved in action. Bomber pilots preferred close screening in which their formation was surrounded by pairs of fighters pursuing a zigzag course. Obviously, the visible presence of the protective fighters gave the bomber pilots a greater sense of security. However, this was a faulty conclusion, because a fighter can only carry out this purely defensive task by taking the initiative in the offensive. He must never wait until attacked because he then loses the chance of acting.
We fighter pilots certainly preferred the free chase during the approach and over the target area. This, in fact, gives the greatest relief and the best protection for the bomber force.[57]
The limited, 600 km (360 mi) total range of the Bf 109E single engined fighters was one of the most serious limitations on the Luftwaffe's tactics in the battle.
[edit] Intelligence
The Luftwaffe was ill-served by its lack of intelligence about the British defences. The German intelligence services were fractured and plagued by rivalries; their overall performance was amateurish. By 1940, there were few if any German agents operating in the UK and a handful of bungled attempts to insert spies into the country were foiled.
As a result of intercepted radio transmissions the Germans began to realise the RAF fighters were being controlled from ground facilities; in July and August 1939, for example, the airship Graf Zeppelin, which was packed with equipment for listening in on RAF radio and RDF transmissions, flew around the coasts of Britain. Although the Luftwaffe correctly interpreted the purpose of these new ground control procedures, they were incorrectly assessed as being rigid and ineffectual. The existence of a British radar system was well known to the Luftwaffe from intelligence gathered before the war, but the highly developed "Dowding system" linked with fighter control had been a well kept secret.[58] Even when good information existed, such as a November 1939 Abwehr assessment of Fighter Command strengths and capabilities by Abteilung V, it was ignored if it did not match conventional preconceptions.
On 16 July 1940, Abteilung V, commanded by Oberstleutnant "Beppo" Schmid, produced a report on the RAF and on Britain's defensive capabilities which was adopted by the frontline commanders as a basis for their operational plans. One of the most conspicuous failures of the report was the lack of any information on the RAF's RDF network and control systems.[59] An optimistic and, as it turned out, erroneous conclusion reached was:
D. Supply Situation... At present the British aircraft industry produces about 180 to 300 first line fighters and 140 first line bombers a month. In view of the present conditions relating to production (the appearance of raw material difficulties, the disruption or breakdown of production at factories owing to air attacks, the increased vulnerability to air attack owing to the fundamental reorganization of the aircraft industry now in progress), it is believed that for the time being output will decrease rather than increase.
In the event of an intensification of air warfare it is expected that the present strength of the RAF will fall, and this decline will be aggravated by the continued decrease in production.
Because of this statement there was a mindset in the ranks of the Luftwaffe that the RAF would run out of front line fighters. Many times the leadership believed Fighter Command's strength had collapsed, only to discover that the RAF were able to send up defensive formations at will.
Throughout the battle, the Luftwaffe had to use numerous reconnaissance sorties to make up for the poor intelligence. Reconnaissance aircraft (at first mostly Dornier Do 17s, but increasingly Bf 110s) proved easy prey for British fighters, as it was seldom possible for them to be escorted by Bf 109s. Thus, the Luftwaffe operated "blind" for much of the battle, unsure of its enemy's true strengths, capabilities, and deployments. Many of the Fighter Command airfields were never attacked, while raids against supposed fighter airfields fell instead on bomber or coastal defence stations. The results of bombing and air fighting were consistently exaggerated, due to over-enthusiastic claims and the difficulty of effective confirmation over enemy territory. In the euphoric atmosphere of perceived victory, Luftwaffe leadership became increasingly disconnected from reality. This lack of leadership and solid intelligence meant the Germans did not adopt any consistent strategy, even when the RAF had its back to the wall. Moreover, there was never a systematic focus on any one type of target (such as airbases, radar stations, or aircraft factories), so the already haphazard effort was further diluted.[60]
[edit] Navigational aids
While the British were using radar for air defence more effectively than the Germans realised, the Luftwaffe attempted to press its own offensive advantage with advanced radio navigation systems the British were initially not aware of. One of these was Knickebein ("curtsey"); this system was used at night and for raids where precision was required. It was rarely used during the Battle of Britain. (See Dr. Reginald Jones and Battle of the Beams).[61]
[edit] Air-sea rescue
The Luftwaffe was much better prepared for the task of air-sea rescue than the RAF, with one unit, the Seenotdienst equipped with Heinkel He 59 floatplanes. Specifically tasked with picking up downed aircrew from the North Sea, English Channel and the Dover Straits. In addition Luftwaffe aircraft were equipped with life rafts and the aircrew were provided with sachets of a chemical called fluorescein which, on reacting with water, created a large, easy to see, bright green patch.[62]
One of the most controversial orders was issued to the RAF on 13 July; this stated that as of 20 July Seenotdienst aircraft would be shot down. One of the reasons given by Churchill was:
We did not recognise this means of rescuing enemy pilots so they could come and bomb our civil population again. . . all German air ambulances were forced down or shot down by our fighters on definite orders approved by the War Cabinet.[63]
On 1 July an He 59 searching for a Luftwaffe crew was forced to alight on the sea after sustaining damage in an attack by 72 Squadron.[64] On 9 July Flt Lt Alan Deere was leading a flight of 54 Squadron Spitfires when they were vectored to unidentified air activity off the coast near Deal, Kent. The flight spotted an aircraft flying at wave top height:
It was a seaplane painted silver, and from a distance there appeared to be civilian registration letters painted on the upper surface of the wing.[65] I was wondering what to do about this unexpected discovery when Johnny burst through on the R/T. "Red Leader there are about a dozen 109s flying in loose formation, well behind and slightly above the seaplane."[66]
Soon afterwards "Red Flight" of 54 Squadron engaged the Bf 109s while "Yellow Flight" attacked the seaplane, which landed on the water with a dead engine.[67] On further investigation it was found that the crew of the He 59 had been radioing information on the movement of British shipping back to headquarters. Questions were also raised as to why an aircraft operating in a "peaceful" role needed a large fighter escort. These events resulted in the Air Ministry issuing a communique to the German government on 14 July:
It has come to the notice of His Majesty's Government in the United Kingdom that enemy aircraft in civilian markings and marked with the red cross have recently flown over British Ships at sea and in the vicinity of the British coast, and that they are being employed for purposes which His Majesty's Government cannot regard as being consistent with the privileges generally accorded to the Red Cross.
His Majesty's Government desire to accord to ambulance aircraft reasonable facilities for the transportation of the sick and wounded, in accordance with Red Cross Convention, and aircraft engaged in the direct evacuation of sick and wounded will be respected, provided that they comply with the relevant provisions of the Geneva Convention (italics added)
His Majesty's Government are unable, however, to grant immunity to such aircraft flying over areas in which operations are in progress on land or at sea, or approaching British or Allied territory, or territory in British occupation, or British or Allied ships.
Ambulance aircraft which do not comply with the above will do so at their own risk and peril.[68]
As a result of this and other encounters with RAF fighters the white He 59s were repainted in camouflage colours and armed with defensive machine guns. Although another four He 59s were shot down by RAF aircraft[69] the Seenotdienst continued to pick up downed Luftwaffe and Allied aircrew throughout the battle, earning praise from Adolph Galland for their gallantry.[70]
[edit] RAF strategy
[edit] The Dowding system
The keystone of the British defence was the complex infrastructure of detection, command, and control that ran the battle. This was the "Dowding System," after its chief architect, Air Chief Marshal Sir H.C.T. "Stuffy" Dowding, the leader of RAF Fighter Command. It should be noted that the original air defence system, which Dowding inherited, had been set up in 1917 by Major General E B Ashmore. Dowding built upon and modernised many of the features which had had been pioneered by Ashmore.[71] During the course of the Battle several Coastal Command and Fleet Air Arm units came under Fighter Command control.
[edit] Groups
The UK's airspace was divided up into four Groups.
- 10 Group defended Wales and the West Country and was commanded by Air Vice-Marshal Sir Quintin Brand.
- 11 Group covered the southeast of England and the critical approaches to London and was commanded by New Zealander Air Vice-Marshal Keith Park.
- 12 Group defended the Midlands and East Anglia and was led by Air Vice-Marshal Trafford Leigh-Mallory.
- 13 Group covered the north of England, Scotland and Northern Ireland and was commanded by Air Vice-Marshal Richard Saul.
 Air Chief Marshal Hugh Dowding |
 Keith Park in front of his Hurricane OK-2 on Malta in 1942 |
 Trafford Leigh-Mallory |
[edit] Control systems
Usually the first indications of incoming air raids were received by the Chain Home Radio Direction Finding (RDF, the original RAF name for Radar) facilities which were located around the coastlines of the UK. In most circumstances RDF could pick up formations of Luftwaffe aircraft as they organised themselves over their own airfields. Once the raiding aircraft moved inland over England the formations were also plotted by the Observer Corps. The information from RDF and the Observer Corps were sent through to the main operations room of Fighter Command Headquarters at Bentley Priory. The plots were assessed to determine whether they were "hostile" or "friendly". If the aircraft formations were hostile the information was sent to the main "operations room" which was in a large underground bunker.
Here the course information of each raid was plotted by WAAFs who received information via a telephone system. Additional intelligence was provided by the "Y" Service radio posts, which monitored enemy radio transmissions, and the "Ultra" decoding centre based at Bletchley Park. Colour coded counters representing each raid were placed on a large table, which had a map of the UK overlaid and squared off with a British Modified Grid. The colour coding (red, yellow and blue) of each counter was changed every five minutes, conforming to a colour coded 24 hour sector clock. As the plots of the raiding aircraft moved the counters were pushed across the map by magnetic "rakes". This system enabled the main "Fighter Controller" (usually of squadron leader rank) and Dowding to see very quickly where each formation was heading and allowing an estimate to be made of possible targets. Because of the simplicity of the system decisions could be made quickly and easily.
Apart from the controller, most of the room and map information was operated by members of the WAAF. Before the war there was still a great deal of doubt about the abilities of women to be able to stand up to battle conditions, with many airwomen being employed on front-line RDF stations and aerodromes.[72] Experience during the battle proved that such doubts were unfounded and the contribution of the WAAFs became essential to the RAF in its control and communications systems, as well as in many other duties.[73] [74]
This information was simultaneously sent to the HQ of each Group (for example, RAF Uxbridge for 11 Group),[75] where it was "filtered" through a filter room (that is, collated, cross-checked and simplified), before being sent through to another operations room, again housed in an underground bunker. Because Group controlled the tactical control of the battle, the operations room was different in layout to the one at Bentley Priory. The main map on the plotting table represented the Group command area and its associated airfields. Extensive radio and telephone equipment transmitted and received a constant flow of information from the various sector airfields as well as the Observer Corps, AA Command and the navy. The "Duty fighter controller" was (for example in 11 Group) Park's personal representative whose job was to control how and when each raid would be dealt with. He ordered the squadrons airborne and positioned them as he thought best. Timing was of the essence, because:
Each minute of unnecessary delay waiting to make absolutely sure that the raid was coming in meant about 2,000 feet of vital altitude our fighters would not have when they met the enemy
(Wing Commander Lord Willoughby de Broke, Senior Fighter Controller, Uxbridge.)
Each Group room had a "tote board" which showed each squadron available to that group. The tote board had a system of lights which enabled the controllers to see the squadron status: Released (not available); Available (airborne in 20 minutes); Readiness (airborne in five minute); Standby (pilots in cockpit, airborne in 2 minutes); Airborne and moving into position; Enemy sighted; Ordered to land; Landed and refuelling/rearming. Next to the tote board, where it could be clearly seen, was a weather board which showed the state of the weather around each airfield. It was the responsibility of the WAAF plotters to continually update the tote and weather boards.[76][77]
A vital role was played by the telephone engineers of the GPO:
who worked all hours repairing communications, installing completely new facilities in the emergency centres, and keeping the nervous system of Fighter Command functioning
(Air Commodore Eric Roberts, Commander Middle Wallop Sector in 1940)
Despite appearances, the Groups were not mutually supporting; Park, for instance, could only request, not demand, assistance from Brand (from whom he often got it), nor from Leigh-Mallory (from whom he more often did not). This was because Dowding had never issued standing orders to assist, nor had he created a method to co-ordinate it.[60]
There was a further problem in that the aircraft were not assigned equitably between Groups. While the most effective RAF fighter was the Spitfire, 70% of 11 Group aircraft were Hurricanes. "In total, less then a third of Britain's best fighters were operating in the key sector."[78]
[edit] Sectors
The Group areas were subdivided into Sectors; each commanding officer was assigned between two and four squadrons. Sector Stations, comprising an aerodrome with a "Sector operations room", were the heart of this organisation, and they were also responsible for operating satellite aerodromes to which squadrons could be dispersed. The operations rooms duplicated those at the Group HQs, although they were on a smaller scale and most were still housed in brick, single-storey, tile roofed structures above ground, where they were vulnerable to attack. By 1940 most were semi-protected by an earth bank or "blast wall" surrounding them which reached as high as the eaves. Fortunately for Fighter Command Luftwaffe Intelligence was unaware of the importance of these rooms and most were left alone. The control rooms at Biggin Hill were completely destroyed by a raid on 31 August, although this was a chance bomb hit. Their vulnerability in time of war was appreciated and new airfields built during the expansion programme of the 1930s had new, bomb proof Mk II, L-shaped structures. As a further precaution emergency control rooms were set up in different locations away from the airfields, with a small loss in efficiency; RAF Kenley, for example, could use an alternative room housed in a butcher's shop. The plotting table was laid out with a map of the sector and its airfields and the tote and weather boards reflected this more localised information.[77]
When ordered by their Group HQ, the sector stations would "scramble" their squadrons into the air. Once airborne, the squadrons would be directed by radio-telephone (R/T) from their sector station. Squadrons could be ordered to patrol airfields or vital targets or be "vectored" to intercept incoming raids. As well as directing the fighter squadrons, Sector stations also controlled the anti-aircraft batteries in their area; an army officer sat beside each fighter controller and directed the gun crews when to open fire and, if RAF aircraft flew into the gun-zones, ordered the guns to cease fire.[79]
[edit] Limitations
Though it was the most sophisticated air defence system in the world at that time, the Dowding System had many limitations, including, but not often stressed, its emphatic need for qualified ground maintenance personnel, many of whom had received their training under the Aircraft Apprentice scheme instituted by Hugh Trenchard. RDF (radar) was subject to significant errors and the Observer Corps had difficulties tracking raids at night and in bad weather. R/T communications with airborne fighters were restricted because of the RAF's use of High-Frequency (HF) radio sets. HF radio is limited in frequency range and even with a network of relay stations, the squadrons could not roam more than one or two sectors from their airfields. Distortion and interference often made communication difficult. It was also restricted to a single frequency per squadron, making inter-squadron communication impossible. Finally, the system for tracking RAF fighters, known as HF/DF or "Huff-Duff", restricted sectors to a maximum of four squadrons in the air. The addition of IFF, "Pipsqueak", while a welcome help in identifying RAF aircraft, took up another radio channel.
This is, in part, a reflection of the novelty of the type of combat, as well as the control system. It was perfectly possible for Sector Control to have been assigned one frequency for all fighters to "listen out" on (or "guard", in modern parlance), with "roving" intercept guidance, rather than the close positive control used, which limited controllers' ability to handle large numbers of interceptors.[60]
Starting in late September 1940 VHF T/R Type 1133 radios started replacing the HF TR9 sets. These had first been fitted to Spitfires of 54 and 66 Squadrons in May 1940, but ensuing production delays meant the bulk of Spitfires and Hurricanes were not fitted with this equipment for another five months. The pilots then enjoyed a much clearer reception over a longer range and controllers and pilots had a wider range of communications channels to choose from.[80]

[edit] Efficiency
In spite of this, Fighter Command at times achieved interception rates greater than 80%. The R/T problems were solved late in the battle with the adoption of Very High-Frequency (VHF) radio sets. For all of its faults, RAF's system of ground control directed its fighters to be where they were needed. The Luftwaffe, with no such system, was always at a disadvantage.
[edit] Effect of signals intelligence
It is unclear how much the British intercepts of the Enigma cipher, used for high-security German radio communications, affected the battle. Ultra, the information obtained from Enigma intercepts, gave the highest echelons of the UK's command a view of German intentions but it seems little of this material filtered down to Hugh Dowding's desk. (It would have had little tactical value in any case.) However, the radio listening service (known as Y Service), monitoring the patterns of Luftwaffe radio traffic, contributed considerably to the early warning of raids.[nb 7]
[edit] Air-sea rescue
One of the biggest oversights of the entire system was the lack of a proper air-sea rescue organisation; the RAF had started organising a system in 1940 with High Speed Launches (HSLs) being based around flying boat bases and at a number of overseas locations. But it was still believed that the amount of cross-Channel traffic meant that there was no need for a rescue service to cover these areas. Downed pilots and aircrew, it was hoped, would be picked up by any boats or ships which happened to be passing by. Otherwise the local life boat would be alerted, assuming someone had seen the pilot going into the water.[81]
RAF aircrew were issued with a life jacket, nicknamed the "Mae West" but in 1940 it still required manual inflation, which was almost impossible for someone who was injured or in shock. The waters of the English Channel and Dover Straits are cold, even in the middle of summer, and clothing issued to RAF aircrew did little to insulate them against these freezing conditions. A conference in 1939 had placed air-sea rescue under Coastal Command. Because a number of pilots had been lost at sea during the "Channel Battle", on 22 August, control of RAF rescue launches was passed to the local naval authorities and 12 Lysanders were given to Fighter Command to help look for pilots at sea. In all some 200 pilots and aircrew were lost at sea during the battle. No proper air-sea rescue service was to be formed until 1941.[82]
[edit] Tactics

The weight of the battle fell upon 11 Group. Keith Park's tactics were to dispatch individual squadrons to intercept raids. The intention was to subject attackers to continual attacks by relatively small numbers of aircraft and try to break up the tight formations of bombers. Once formations had fallen apart, stragglers could be picked off one by one. Where multiple squadrons reached a raid the procedure was for the slower Hurricanes to tackle the bombers while the more agile Spitfires held up the fighter escort. This ideal was not always achieved, however, and sometimes the Spitfires and Hurricanes reversed roles.[83]Park also issued instructions to his units to engage in frontal attacks against the bombers, which were more vulnerable to such attacks. Again, in the environment of fast moving, three-dimensional air battles, few RAF fighter units were able to attack the bombers from head-on.[83]
During the battle, some commanders, notably Leigh-Mallory, proposed squadrons be formed into "Big Wings," consisting of at least three squadrons, to attack the enemy en masse, a method pioneered by Douglas Bader.

Proponents of this tactic claimed interceptions in large numbers caused greater enemy losses while reducing their own casualties. Opponents pointed out the big wings would take too long to form up, and the strategy ran a greater risk of fighters being caught on the ground refuelling. The big wing idea also caused pilots to over-claim their kills, due to the confusion of a more intense battle zone. This led to the belief big wings were far more effective than they actually were.
The issue caused intense friction between Park and Leigh-Mallory, as 12 Group were tasked with protecting 11 Group's airfields whilst Park's squadrons intercepted incoming raids. However, the delay in forming up Big Wings meant the formations often did not arrive at all or until after German bombers had hit 11 Group's airfields.[84] Dowding, in an effort to highlight the problem of the Big Wing's performance, submitted a report compiled by Park to the Air Ministry on 15 November. In the report he highlighted the fact that during the period of 11 September – 31 October the extensive use of the Big Wing had resulted in just 10 interceptions and one German aircraft destroyed, but his report was ignored.[85] Postwar analysis agrees Dowding's and Park's approach was best for 11 Group. Dowding's removal from his post in November 1940 has been blamed on this struggle between Park and Leigh-Mallory's daylight strategy. However the intensive raids and destruction wrought during the Blitz also damaged Dowding and Park in particular, for the failure to produce an effective night-fighter defence system, something for which the influential Leigh-Mallory had long criticised them.[86]
[edit] Bomber and Coastal Command contributions

Bomber Command and Coastal Command aircraft flew offensive sorties against targets in Germany and France during the battle. After the initial disasters of the war, with Vickers Wellington bombers shot down in large numbers attacking Wilhelmshaven and the slaughter of the Fairey Battle squadrons sent to France, it became clear that Bomber Command would have to operate mainly at night to achieve any results without incurring very high losses.[87] From 15 May 1940 a night time bomber campaign was launched against German oil industry, communication and forests/crops, mainly in the Ruhr area.
As the threat mounted, Bomber Command changed targeting priority on 3 June 1940 to attack the German aircraft industry. On 4 July the Air Ministry gave Bomber Command orders to attack ports and shipping. By September the build up of invasion barges in the Channel ports had become a top priority target. [88] On 7 September the government issued a warning that the invasion could be expected within the next few days and that night Bomber Command attacked the Channel ports and supply dumps. On 13 September they carried out another large raid on the Channel ports, sinking 80 large barges in the port of Ostend, 84 barges were sunk in Dunkirk after another raid on the 17 September and by the 19 September almost 200 barges had been sunk. [88] The loss of theses barges may had contributed to Hitlers decision to postpone Operation Sealion indefinitely. [88] The success in theses raids was in part due to the fact that the Germans had few Freya radar stations set up in France, meaning air defences of the French harbours were not nearly as good as the air defences over Germany and Bomber Command had directed some 60% of its strength against the Channel ports. The Bristol Blenheim units also raided German occupied airfields throughout July to December 1940, both during daylight hours and at night. Although most of these raids were unproductive there were some successes; on 1 August five out of 12 Blenheims sent to attack Haamstede and Evere (Brussels) were able to bomb, destroying or heavily damaging three Bf 109s of II./JG 27 and apparently killing a Staffelkapitän identified as a Hauptmann Albrecht von Ankum-Frank. Two other 109s were claimed by Blenheim gunners.[89][nb 8] Another successful raid on Haamstede was made by a single Blenheim on 7 August which destroyed one 109 of 4./JG 54, heavily damaged another and caused lighter damage to four more.[90]
There were also some missions which produced an almost 100% casualty rate amongst the Blenheims; one such operation was mounted on 13 August 1940 against a Luftwaffe airfield near Aalborg in north-eastern Denmark by 12 aircraft of 82 Squadron. One Blenheim returned early (the pilot was later charged and due to appear before a Court Martial but was killed on another operation), the other 11, which reached Denmark, were shot down, five by flak and six by Bf 109s.[91] During these and other types of operations, some of which were directed against Germany itself, Blenheim casualty rates were very high, and it is a testament to the courage of the men in these units that they continued to operate throughout these months with little respite and with little of the publicity accorded to Fighter Command.
As well as the bombing operations Blenheim equipped units had been formed to carry out long-range strategic reconnaissance missions over Germany and German occupied territories. In this role the Blenheims once again proved to be too slow and vulnerable against Luftwaffe fighters and they took constant casualties.[92]
Coastal Command directed its attention towards the protection of British shipping, and the destruction of enemy shipping. As invasion became more likely, it participated in the strikes on French harbours and airfields, laying mines, and mounting numerous reconnaissance missions over the enemy held coastline. In all, some 9,180 sorties were flown by bombers from July to October 1940. Although this was small compared with the 80,000 sorties flown by fighters, bombers suffered about 50% of the number of casualties borne by their fighter colleagues. The bomber contribution was therefore much more dangerous on a loss-per-sortie comparison.[93] In his famous 20 August speech about "The Few", praising Fighter Command, Churchill also made a point to mention Bomber Command's contribution, adding that bombers were even then striking back at Germany.[94]
[edit] Phases of the Battle

The Battle can be roughly divided into four phases:
- 10 July–11 August: Kanalkampf, ("the Channel battles").
- 12 August–23 August: Adlerangriff ("Eagle Attack"), the early assault against the coastal airfields.
- 24 August–6 September: the Luftwaffe targets the airfields. The critical phase of the battle.
- 7 September onwards: the day attacks switch to British towns and cities.
[edit] Channel battles

The Kanalkampf comprised a series of running fights over convoys in the English Channel and occasional attacks on the convoys by Stuka dive-bombers. It was launched partly because Kesselring and Sperrle were not sure about what else to do, and partly because it gave German aircrews some training and a chance to probe the British defences.[52] In general, these battles off the coast tended to favour the Germans, whose bomber escorts massively outnumbered the convoy patrols. The need for constant patrols over the convoys put a severe strain on RAF pilots and machines, wasting fuel, engine hours and exhausting the pilots, but eventually the number of ship sinkings became so great the British Admiralty cancelled all further convoys through the Channel. However, these early combat encounters provided both sides with experience. They also gave the first indications some of the aircraft, such as the Defiant and Bf 110, were not up to the intense dog-fighting that would characterise the battle.
[edit] Main assault
The main attack upon the RAF's defences was code-named Adlerangriff ("Eagle Attack").
Weather, which proved an important feature of the campaign, delayed Adlertag, ("Eagle Day") until 13 August 1940. On 12 August, the first attempt was made to blind the Dowding system when aircraft from the specialist fighter-bomber unit, Erprobungsgruppe 210 attacked four radar stations. Three were briefly taken off the air but were back working within six hours.[95] The raids appeared to show that British radars were difficult to knock out for any length of time. The failure to mount follow-up attacks allowed the RAF to get the stations back on the air, and the Luftwaffe neglected strikes on the supporting infrastructure, such as phone lines or power stations, which could have rendered the radars useless, even if the towers themselves (which were very difficult to destroy) remained intact.[60]
Adlertag opened with a series of attacks, led again by Epro 210,[95] on coastal airfields used as forward landing grounds for the RAF fighters, as well as 'satellite airfields'[nb 9] (including Manston and Hawkinge).[95] As the week drew on, the airfield attacks moved further inland, and repeated raids were made on the radar chain. 15 August was "The Greatest Day" when the Luftwaffe mounted the largest number of sorties of the campaign. Luftflotte 5 attacked the north of England. Believing Fighter Command strength to be concentrated in the south, raiding forces from Denmark and Norway ran into unexpectedly strong resistance. Inadequately escorted by Bf 110s, bombers were shot down in large numbers. As a result of the casualties, Luftflotte 5 did not appear in strength again in the campaign.
18 August, which had the greatest number of casualties to both sides, has been dubbed "The Hardest Day". Following the grinding battles of 18 August, exhaustion and the weather reduced operations for most of a week, allowing the Luftwaffe to review their performance. "The Hardest Day" had sounded the end for the Ju 87 in the campaign.[96] This veteran of Blitzkrieg was too vulnerable to fighters to operate over Britain, and to preserve the Stuka force, Göring withdrew them from the fighting. This removed the main Luftwaffe precision-bombing weapon and shifted the burden of pinpoint attacks on the already-stretched Erpro 210. The Bf 110 had also proven too clumsy for dogfighting with single-engined fighters, and its participation was scaled back. It would only be used when range required it or when sufficient single-engined escort could not be provided for the bombers.
Göring made yet another fateful decision: to order more bomber escorts at the expense of free-hunting sweeps. To achieve this, the weight of the attack now fell on Luftflotte 2, and the bulk of the Bf 109s in Luftflotte 3 were transferred to Kesselring's command, reinforcing the fighter bases in the Pas-de-Calais. Stripped of its fighters, Luftflotte 3 would concentrate on the night bombing campaign. Göring, expressing disappointment with the fighter performance thus far in the campaign, also made a large change in the command structure of the fighter units, replacing many Geschwaderkommodoren with younger, more aggressive pilots like Adolf Galland and Werner Mölders.[97]
Finally, Göring stopped the attacks on the radar chain. These were seen as unsuccessful, and neither the Reichsmarschall nor his subordinates realised how vital the Chain Home stations were to the defence. It was known that radar provided some early warning of raids, but the belief among German fighter pilots was that anything bringing up the "Tommies" to fight was to be encouraged.
[edit] Luftwaffe targets RAF airfields
On 19 August 1940, Göring ordered attacks concentrating on aircraft production, then on 23 August 1940 his directive added a focus on RAF airfields, as well as day and night attacks aimed at weakening fighter forces across the United Kingdom. That evening saw the start of a sustained campaign of bombing, starting with a raid on tyre production at Birmingham. Raids on airfields continued through 24 August, and a major attack hit Portsmouth. That night, several areas of London were bombed, with the East End set ablaze and one release hitting central London. These have been attributed to a group of Heinkel He 111s, unable to find their target, releasing their bombs and returning home, unaware they were dropping them on the city, but this account has been contested.[98] In retaliation, the RAF bombed Berlin on the night of 25–26 August, and continued bombing raids on Berlin. These hurt Göring's pride, as he had previously claimed the British would never be allowed to bomb the city, and enraged Hitler.[99]
From 24 August onwards, the battle was essentially a fight between Kesselring's Luftflotte 2 and Park's 11 Group. The Luftwaffe concentrated all their strength on knocking out Fighter Command and made repeated attacks on the airfields. Of the 33 heavy attacks in the following two weeks, 24 were against airfields. The key sector stations were hit repeatedly: Biggin Hill and Hornchurch four times each; Debden and North Weald twice each. Croydon, Gravesend, Rochford, Hawkinge and Manston were also attacked in strength. At least seven attempts were made against Eastchurch, which was not a Fighter Command aerodrome but was believed to be by the Germans. At times these raids knocked out the sector stations, threatening the integrity of the Dowding system. Emergency measures had to be taken to keep the sectors operating.
The RAF was taking many casualties in the air. Aircraft production could replace aircraft, but replacement pilots were barely keeping pace with losses, and novice fliers were being shot down at an alarming rate. To offset losses, some 58 Fleet Air Arm fighter pilot volunteers were seconded to RAF squadrons, and a similar number of former (single-engine) Fairey Battle pilots were used. Most replacements from Operational Training Units (OTUs) had as little as nine hours flying time and no gunnery or air-to-air combat training. At this point the multinational nature of Fighter Command came to the fore. Many squadrons and individual personnel from the air forces of the Dominions were already attached to the RAF, including top level commanders — Australians, Canadians, New Zealanders, Rhodesians and South Africans — they were bolstered by the arrival of fresh Czechoslovak and Polish squadrons. These Polish and Czech squadrons had been held back by Dowding, who mistakenly thought non-English speaking aircrew would have trouble working within his control system. In addition there were other nationals, including Free French, Belgian and even a Jewish pilot from the British mandate of Palestine.

Polish and Czech fliers proved especially effective. The pre-war Polish Air Force had lengthy and extensive training, and high standards; with Poland conquered and under brutal German occupation, the Polish pilots of No. 303 (Polish) Squadron, the highest-scoring allied unit,[100] were strongly motivated. Josef František, a Czech regular airman who had flown from the occupation of his own country to join the Polish and then French air forces before arriving in Britain, flew as a guest of 303 Squadron and was ultimately credited with the highest "RAF score" during in the Battle of Britain.[101]
The RAF had the advantage of fighting over home territory. Pilots who bailed out of their downed aircraft could be back at their airfields within hours. For Luftwaffe aircrews, a bail out over England meant capture, while parachuting into the English Channel often meant drowning or death from exposure. Morale began to suffer, and Kanalkrankheit ("Channel sickness") — a form of combat fatigue — began to appear among the German pilots. Their replacement problem was even worse than the British. Though the Luftwaffe maintained its numerical superiority, the slow appearance of replacement aircraft and pilots put increasing strain on the resources of the remaining attackers.
Formerly, conventional wisdom was that the Luftwaffe was winning even so. Recent research shows that this was not true. Throughout the battle, the Germans
greatly underestimated the size of the RAF and the scale of British aircraft production. Across the Channel, the Air Intelligence division of the Air Ministry consistently overestimated the size of the German air enemy and the productive capacity of the German aviation industry. As the battle was fought, both sides exaggerated the losses inflicted on the other by an equally large margin. However, the intelligence picture formed before the battle encouraged the German Air Force to believe that such losses pushed Fighter Command to the very edge of defeat, while the exaggerated picture of German air strength persuaded the RAF that the threat it faced was larger and more dangerous than was actually the case.[102]
This led the British to the conclusion that another fortnight of attacks on airfields might force Fighter Command to withdraw their squadrons from the south of England. The German misconception, on the other hand, "encouraged first complacency, then strategic misjudgement. The shift of targets from air bases to industry and communications was taken because it was assumed that Fighter Command was virtually eliminated."[103] Yet this analysis ignores the fact that Fighter Command continued to be desperately short of pilots rather than aircraft, as indeed it had been from the start of the Battle. Incompletely trained recruits, and instructors cannibalised from the training program, did not augur well for the ability to sustain the defence.[60][104][105] German losses meanwhile had become unacceptable between the 24 August and 4 September,
Serviceability rates, which were acceptable at Stuka units, were running at 75% with Bf 109s, 70% with bombers and 65% with Bf 110s, indicating a shortage of spare parts. All units were well below established strength. The attrition was beginning to tell, particularly on the fighters.[106]
By 14 September the Luftwaffe's Bf 109 Geschwader possessed only 67 percent of their operational crews against authorized aircraft. For Bf 110 units it was 46 percent; and for bombers it was 59 percent. Only a week later the figures were 64 percent, 52 percent, and 52 percent respectively.[107] Due to the failure of the Luftwaffe to establish air supremacy, a conference assembled on 14 September at Hitler's headquarters. Hitler concluded that air superiority had not yet been established and "promised to review the situation on 17 September for possible landings on 27 September or 8 October. Three days later, when the evidence was clear that the German Air Force had greatly exaggerated the extent of their successes against the RAF, Hitler postponed Sealion indefinitely."[108] However, at the meeting on 14 September, the leadership of the Luftwaffe had persuaded him to give them a last chance to cow the RAF. "The air force chief of staff, General Hans Jeschonnek ... asked Hitler to allow him to attack residential areas to create 'mass panic'. Hitler refused, perhaps unaware of just how much damage had already been done to civilian targets. 'Mass panic' was to be used only as a last resort. Hitler reserved for himself the right to unleash the terror weapon. The political will was to be broken by the collapse of the material infrastructure, the weapons industry, and stocks of fuel and food. On 16 September Göring ordered the air fleets to begin the new phase of the battle. Like the campaign in Kosovo in the spring of 1999, and Operation Rolling Thunder in the Vietnam War, air power was expected to deliver the political solution by undermining military capability and the conditions of daily existence."[109]
[edit] Raids on British cities

Hitler's No. 17 Directive, issued 1 August 1940 on the conduct of war against England specifically forbade for the Luftwaffe to conduct terror raids on its own initiative, and reserved the right of ordering terror attacks as means of reprisal for the Führer himself,[110] despite the raids conducted by RAF Bomber Command against German cities since May 1940. This echoed Göring's general order issued on 30 June, 1940 on the the air war against the island fortress:
The war against England is to be restricted to destructive attacks against industry and air force targets which have weak defensive forces. ... The most thorough study of the target concerned, that is vital points of the target, is a pre-requisite for success. It is also stressed that every effort should be made to avoid unnecessary loss of life amongst the civilian population.[111]
The Luftwaffe offensive against Britain had included numerous raids on major ports since August, but Hitler had issued a directive London was not to be bombed save on his sole instruction[citation needed]. However, on the night of 23 August,[112] bombs were accidentally dropped on Harrow on the outskirts of London as well as raids on Aberdeen, Bristol and South Wales. The focus on attacking airfields had also been accompanied by a sustained bombing campaign which begun on 24 August with the largest raid so far killing 100 in Portsmouth, and that evening the first night raid on London as described above.[98] On 25 August 1940, 81 bombers of Bomber Command were sent out to raid industrial and commercial targets in Berlin. Cloud prevented accurate identification and the bombs fell across the city, causing some casualties amongst the civilian population as well as damage to residental areas.[113] Continuing RAF raids on Berlin in retaliation led to Hitler withdrawing his directive[114], and on 3 September Göring planned to bomb London daily, with Kesselring's enthusiastic support, having received reports the average strength of RAF squadrons was down to five or seven fighters out of 12 and their airfields in the area were out of action. Hitler issued a directive on 5 September to attack cities including London.[115][116] In his speech delivered on the 4 September 1940, Hitler threatened to obliterate (ausradieren) British cities if British bombing runs against Germany would not stop.

On 7 September 1940 a massive series of raids involving nearly four hundred bombers and more than six hundred fighters targeted docks in the East End of London, day and night. Though suffering from shortages, the RAF anticipated attacks on airfields and 11 Group rose to meet them, in greater numbers than the Luftwaffe expected. The first official deployment of 12 Group's Big Wing took twenty minutes to gain formation, missing its intended target, but encountering another formation of bombers while still climbing. They returned, apologetic about their limited success, and blamed the delay on being requested too late.[99][117] Next morning, Keith Park flew his Hurricane over the city: "It was burning all down the river. It was a horrid sight. But I looked down and said 'Thank God for that', because I knew that the Nazis had switched their attack from the fighter stations thinking that they were knocked out. They weren't, but they were pretty groggy". Luftwaffe raids across Britain continued, with large attacks on London targeting the docks or bombing indiscriminately.[citation needed] Fighter Command had been at its lowest ebb, short of men and machines, and the break from airfield attacks allowed them to recover. 11 Group had considerable success in breaking up daytime raids. 12 Group repeatedly disobeyed orders and failed to meet requests to protect 11 Group airfields, but their experiments with increasingly large Big Wings had some successes. The Luftwaffe began to abandon their morning raids, with attacks on London starting late in the afternoon for 57 consecutive nights of attacks.[118]
The most damaging aspect to the Luftwaffe of the change in targets (to London) was the increase in range. The Bf 109 escorts had a limited fuel capacity, and by the time they arrived over the city, had only 10 minutes of flying time before they had to turn for home. This left many raids undefended by fighter escorts. RAF Bomber Command contributed to the problems facing the German naval forces by sinking eighty barges in the Port of Ostend alone.[112]
On 14 September Hitler chaired a meeting with the OKW staff. Göring was absent in France, as he had decided to direct the decisive part of the battle from there, and left Erhard Milch to deputise for him.[119] At the meeting Hitler raised the question, "Should we call it off altogether?". Hitler had accepted that an invasion, with massive aircover, was no longer possible. Instead he opted to try and crush British morale, while maintaining the threat of invasion. Hitler concluded this may result in "eight million going mad" (referring to the population of London in 1940), which would "cause a catastrophe" for the British. In those circumstances, Hitler said, "even a small invasion might go a long way". At this point Hitler was against cancelling the invasion as, "the cancellation would reach the ears of the enemy and strengthen his resolve".[120][121]
On 15 September, two massive waves of German attacks were decisively repulsed by the RAF, with every single aircraft of 11 Group being used on that day. The total casualties on this critical day were 60 German aircraft shot down versus only 26 RAF. The German defeat caused Hitler to order, two days later, the postponement of preparations for the invasion of Britain. Henceforth, in the face of mounting losses in men, aircraft and the lack of adequate replacements, the Luftwaffe switched from daylight to night-time bombing.
On 13 October, Hitler again postponed the invasion until the spring of 1941; however, the invasion never happened, and October is regarded as the month in which regular bombing of Britain ended.[112] It was not until Hitler's Directive 21 was ordered on 18 December 1940, that the threat of invasion finally dissipated.[112]
During the battle, and for the rest of the war, an important factor in keeping public morale high was the continued presence of King George VI and his wife Queen Elizabeth. When war broke out in 1939, the King and Queen chose to stay in London and not flee to Canada, as had been suggested.[nb 10] George VI and Elizabeth officially stayed in Buckingham Palace throughout the war, although they often spent weekends at Windsor Castle to visit their daughters, Elizabeth (the future queen) and Margaret.[122] Buckingham Palace was damaged by bombs which landed in the grounds on 10 September and on 13 September, when more serious damage was caused by two bombs which destroyed the Royal Chapel. The royal couple were in a small sitting room about 80 yards from where the bombs burst.[123][124] On 24 September, in recognition of the bravery of civilians King George VI inaugurated the award of the George Cross.
[edit] Aftermath
The Battle of Britain marked the first defeat of Hitler's military forces, with air superiority seen as the key to victory. Pre-war theories led to exaggerated fears of strategic bombing, and British public opinion was invigorated by having come through the ordeal. To Hitler it did not seem a serious setback, as Britain was still not in a position to cause real damage to his plans, and the last minute invasion plan had been an unimportant addition to German strategy. However, for the British, Fighter Command had achieved a great victory in successfully carrying out Sir Thomas Inskip's 1937 air policy of preventing the Germans from knocking Britain out of the war. Fighter Command was so successful that the conclusion to Churchill's famous 'Battle of Britain' speech made in the House of Commons on 18 June, has come to refer solely to them: "...if the British Empire and its Commonwealth lasts for a thousand years, men will still say, 'This was their finest hour.'"[125]
The Battle also signalled a significant shift in U.S. opinion. During the battle, many people from the U.S. accepted the view promoted by Joseph Kennedy, the U.S. ambassador in London, and believed the UK could not survive. However, Roosevelt wanted a second opinion, and sent "Wild Bill" Donovan on a brief visit to Britain, who became convinced Britain would survive and should be supported in every possible way.[126][127]
Both sides in the battle made exaggerated claims of numbers of enemy aircraft shot down. In general, claims were two to three times the actual numbers, because of the confusion of fighting in dynamic three-dimensional air battles. Postwar analysis of records has shown between July and September, the RAF claimed 2,698 kills (against 1,023 fighters lost to all causes), while the Luftwaffe fighters claimed 3,198 RAF aircraft downed (against losses of 873 fighters and 1,214 bombers). To the RAF figure should be added an additional 376 Bomber Command and 148 Coastal Command aircraft conducting bombing, mining, and reconnaissance operations in defence of the country.[5]
Three historians, Dr Christina Goulter, Professor Gary Sheffield, and Dr. Andrew Gordon, who teach at Joint Services Command and Staff College, have suggested the existence of the Royal Navy was enough of a deterrent to the Germans;[128] even had the Luftwaffe won, the Germans had limited means with which to combat the Royal Navy, which would have intervened to prevent a landing. Some veterans of the battle point out the Royal Navy would have been vulnerable to air attack by the Luftwaffe if Germany had achieved air superiority,[129] quoting the fate of Prince of Wales and Repulse which, in December 1941, were overwhelmed by air power alone.[129]
Though the claims about the Royal Navy's ability to repel an invasion may be contested, there is a consensus among historians that the Luftwaffe simply could not crush the RAF, without which a successful invasion of Britain was impossible. Stephen Bungay[130] described Dowding's and Park's strategy of choosing when to engage the enemy whilst maintaining a coherent force as vindicated. The RAF, not the Luftwaffe, proved to be a robust and capable organisation which was to use all of the modern resources available to it to the maximum advantage.[131] Richard Evans wrote:
Irrespective of whether Hitler was really set on this course, he simply lacked the resources to establish the air superiority that was the sine qua non of a successful crossing of the English Channel. A third of the initial strength of the German air force, the Luftwaffe, had been lost in the western campaign in the spring. The Germans lacked the trained pilots, the effective fighter planes, and the heavy bombers that would have been needed.[132][133]
The Luftwaffe had 1,380 bombers on 29 June 1940, by 2 November 1940 this increased to 1,423 level bombers;[134] and to 1,511 by 21 June 1941, prior to Operation Barbarossa but showing a drop of 200 from 1,711 reported on 11 May 1940.[135][136][137]i 1,107 single- and 357 twin-engined daylight fighters were reported on strength prior to the Battle on 29 June 1940, compared to 1,440 single-engined fighters and 188 twin-engined fighters and 263 night-fighter aircraft on 21 June 1941.[135][138].
The Germans launched some spectacular attacks against important British industries, but they could not destroy the British industrial potential, and made little systematic effort to do so. Hindsight does not disguise the fact the threat to Fighter Command was very real and for the participants, it seemed as if there was a narrow margin between victory and defeat. The victory was as much psychological as physical. Alfred Price:
The truth of the matter, borne out by the events of 18 August is more prosaic: neither by attacking the airfields, nor by attacking London, was the Luftwaffe likely to destroy Fighter Command. Given the size of the British fighter force and the general high quality of its equipment, training and morale, the Luftwaffe could have achieved no more than a Pyrrhic victory. During the action on 18 August it had cost the Luftwaffe five trained aircrewmen killed, wounded or taken prisoner, for each British fighter pilot killed or wounded; the ratio was similar on other days in the battle. And this ratio of 5:1 was very close to that between the number of German aircrew involved in the battle and those in Fighter Command. In other words the two sides were suffering almost the same losses in trained aircrew, in proportion to their overall strengths...In the Battle of Britain, for the first time during the Second World War, the German war machine had set itself a major task which it had patently failed to achieve; and in failing it demonstrated that it was not invincible. In stiffening the resolve of those determined to resist Hitler the battle was an important turning point in the conflict.[139]
The British triumph in the Battle of Britain was won at a heavy cost. Total British civilian losses from July to December 1940 were 23,002 dead and 32,138 wounded, with one of the largest single raids occurring on 19 December 1940, in which almost 3,000 civilians died.
The brilliant leadership of Dowding and Keith Park in successfully proving their theories of air defence, however, had created enmity among RAF senior commanders and, in a shabby episode, both were sacked from their posts in the immediate aftermath of the battle.[140]
The end of the battle allowed the UK to rebuild its military forces and establish itself as an Allied stronghold. Britain later served as a base from which the Liberation of Western Europe was launched.
[edit] Divisions amongst Historians
While the overall course and aftermath of the battle is not in dispute, there is evidence of differences between German and allied historians over its effect on Luftwaffe strength. Stephen Bungay reflects the orthodox view:
In the summer of 1940, the RAF dealt the Luftwaffe a body-blow from which, as Theo Osterkamp ruefully observed, it never recovered, and it heralded a feckless decline. Despite its victories in Russia in 1941, it was never again to be as strong, relative to its enemies, as it was in July 1940[141]
Dr Williamson Murray, Professor of Military Theory at the Marine Corps University and Professor at Ohio State University comments:
Although the Germans had suffered the hardest psychological knocks, since it had been their air offensive that had failed, their reaction seems at best represented by Jeschonnek's remark shortly before the invasion of Russia: "At last a proper war!". Before going on to examine the full implications of such a statement, one should note that Jeschonnek and the General Staff paid minimal attention to the attrition that had taken place, not only in the Battle of Britain but in the land campaign that had preceded it. Thus, willfully and confidently, they embarked on a campaign to conquer the largest nation in the world with an air force that quantitatively was virtually the same size as it had been the previous year and that was arguably weaker in terms of crew experience and training. Moreover, industrial production of aircraft had stagnated for the third consectutive year[142]
John Foreman, author of several studies on RAF Fighter Command operations and the 'Blitz', wrote:
Certainly the major phase of daylight assault has changed, but the battle was by no means finished. Only the German tactics have changed. The magic date of 'October the thirty-first' is of course, widely accepted, but German historians disagree vehemently; they maintain that the German Luftwaffe continued to attack Britain both night and day until May 1941 - which cannot be denied. [...] It's hard to dispute this logic. The battle ends when the attacker ceases his attacks, or is defeated. This raises another contentious question; if the Royal Air Force 'won' the battle, surely the Luftwaffe were defeated - and again this could not be further from the truth. Within six months the German Air Force had been instrumental in reversing all British gains in North Africa, had aided the Wehrmacht in forcing the British Expeditionary Force out of Greece and Crete and had achieved the most crushing air supremacy in Russia - the latter equalled only by the Israeli Air Force in the Six-Day War of 1967. A 'beaten' air force? Not until May 1945.[143]
[edit] Battle of Britain Day
Winston Churchill summed up the effect of the battle and the contribution of Fighter Command with the words, "Never in the field of human conflict was so much owed by so many to so few".[94][144] Pilots who fought in the Battle have been known as The Few ever since. Battle of Britain Day is commemorated in the United Kingdom on 15 September. Within the Commonwealth, Battle of Britain Day is usually observed on the third Sunday in September.
[edit] Film
The story of the battle was documented in the 1969 film Battle of Britain, which drew many respected English actors to act key figures of the battle, including Sir Laurence Olivier as Hugh Dowding and Trevor Howard as Keith Park. It also starred Michael Caine, Christopher Plummer and Robert Shaw as airfield commanders. Former participants of the battle served as technical advisors including Douglas Bader, James Lacey, Adolf Galland and Dowding himself.
It was also the subject of 1941 Allied propaganda film Churchill's Island, winner of the first-ever Academy Award for Documentary Short Subject.[145]
[edit] See also
[edit] Battle Information
[edit] Battle in Contemporary History
- The Darkest Hour
- The Few
- Coventry Blitz
- Evacuations of civilians in Britain during World War II
- History of the Luftwaffe 1933 - 1945
[edit] Post-War Memorials
- Battle of Britain Memorial Flight
- Battle of Britain Memorial, Capel-le-Ferne
- Battle of Britain Monument in London
- Kent Battle of Britain Museum
- Battle of Britain Class Steam Locomotives of the Southern Railway
- Battle of Britain II: Wings of Victory, a PC flight simulator about the battle
[edit] References
[edit] Notes
- ^ 754 single-seat fighters, 149 two-seat fighters, 560 bombers and 500 coastal aircraft. The RAF fighter strength given is for 0900 1 July 1940, while bomber strength is for 11 July 1940.[2]
- ^ 1,107 single-seat fighters, 357 two-seat fighters, 1,380 medium bombers, 428 dive-bombers, 569 reconnaissance and 233 coastal aircraft. The Luftwaffe air strength given is from the Quartermaster General 6th Battalion numbers for 29 June 1940.[3]
- ^ 1,023 fighters, 376 bombers and 148 aircraft from Coastal Command.
- ^ 873 fighters and 1,014 bombers destroyed.[5]
- ^ 27,450 killed and 32,138 wounded.[citation needed]
- ^ This was the turning radius of a 109, meaning that both aircraft, if necessary, could turn together at high speed(Bungay 2000, p. 259).
- ^ This same sort of warning was provided to North Vietnam by Soviet "spy trawlers" during the Vietnam War.
- ^ This account comes from Warner, Graham. The Bristol Blenheim: A Complete History, 2nd edition. London: Crecy Publishing Ltd, 2005, p. 253. Ramsay 1989, lists no aircrew casualties and only three 109s in total destroyed or damaged.
- ^ "Satellite" airfields were mostly fully equipped but did not have the sector control room which allowed "Sector" airfields such as Biggin Hill to monitor and control RAF fighter formations. RAF units from Sector airfields often flew into a satellite airfield for operations during the day, returning to their home airfield in the evenings.
- ^ This proposal has since been confused, or conflated, with a possible flight by HMG in exile.
[edit] Citations
- ^ Rino Corso Fougier
- ^ Bungay 2000, p. 107.
- ^ Bungay 2000, p. 107.
- ^ Ramsay 1989, pp. 251–297.
- ^ a b c Bungay 2000, p. 368.
- ^ Battle of Britain RAF and FAA role of honour. Retrieved: 14 July 2008
- ^ Peszke 1980, p. 134.
- ^ Battle of Britain 1940
- ^ Bungay 2000, p. 388.
- ^ Bungay 2000, pp. 305–306: The strategic bombing commenced after the Germans bombed London on september 14th, 1940, followed by the RAF bombing Berlin and German Air force bases in France, causing Hitler to withdraw his directive and order on the attacks on British cities, unitl the air force was ready to fly one again.
- ^ The Spitfire, an operational history - 2. Into action
Junkers Ju 88 4D+EK - ^ Bungay 2000, p. 9.
- ^ Bungay 2000, p. 11.
- ^ Hitler's Directive of 16 July (Note: see "Appendix 1") Retrieved: 13 June 2008.
- ^ RN Strength returns Retrieved: 12 April 2008.
- ^ Ellis 1990, p. 15.
- ^ Hooton 2007, p. 74.
- ^ Bungay 2000, p. 111.
- ^ Robinson 2005, no page number.
- ^ Taylor and Mayer 1974, p. 72.
- ^ Dönitz 1958 (1997 edition), p. 114.
- ^ Raeder 2001, p. 321.
- ^ Holmes 1998, pp. 18–19.
- ^ Price 2002, p. 78.
- ^ Feist 1993, p. 29.
- ^ Green 1980, p. 73.
- ^ a b Bungay 2000, pp. 257–258.
- ^ Green 1962, p. 33.
- ^ Bungay 2000, pp. 84, 178, 269–273.
- ^ a b Ansell 2005, pp. 712–714.
- ^ a b Price 1980, pp. 6–10.
- ^ Bungay 2000, p. 86.
- ^ a b Ponting 1991, p. 130.
- ^ a b c Bungay 2000, p. 260.
- ^ a b Bungay 2000, p. 259.
- ^ Ramsay 1989, pp. 757–790.
- ^ "Battle of Britain Roll of Honour". RAF website, Ministry of Defence, 20 March 2006. Retrieved: 4 April 2007.
- ^ Participants in the Battle of Britain
- ^ Bungay 2000, p. 249.
- ^ Price 1996
- ^ Bungay 2000, p. 250.
- ^ Holmes 2007, p. 61.
- ^ Price 1980, pp. 28–30.
- ^ Bungay 2000, p. 362.
- ^ Price 1996, p. 55.
- ^ a b Price 1980, pp. 12–13.
- ^ Bungay 2000, pp. 163–164.
- ^ Finnish Fighter Tactics Retrieved: 26 April 2008.
- ^ Price 1980, pp. 13–15.
- ^ Weal 1999, pp. 42–51.
- ^ a b Bungay 2000, p. 119.
- ^ a b Bungay 2000, p. 122.
- ^ Wood&Dempster, 2003. Pg. 216
- ^ Weal 1999, pp. 47–48.
- ^ Weal 1999, p. 49.
- ^ Weal 1999, p. 50.
- ^ Holmes 2007, p. 69.
- ^ The Battle of Britain, A German Perspective; Lt Col Earle Lund, USAF Retrieved: 13 June 2008.
- ^ a b Abteilung V Intelligence Appreciation of the RAF (Note: see "Appendix 4") Retrieved: 13 June 2008.
- ^ a b c d e Allen 1974
- ^ Bungay 2000, p. 342.
- ^ Orange 2001, p. 98.
- ^ Churchill 1949, p. 332.
- ^ Ramsay 1987, p.113.
- ^ Note: At this time the unarmed He 59s were painted overall white with red crosses on the fuselage sides along with civilian registration letters, which were also painted on the top and bottom wing surfaces.
- ^ Deere 1974, p. 89. Note: Deere records this as happening on 11 July; Ramsay (1987) shows that these events occurred on 9 July.
- ^ Ramsay 1987, p.120.
- ^ Deere 1974, pp. 95–96.
- ^ Ramsay 1989, pp.602, 680.
- ^ Galland 2005, p. 33.
- ^ Bungay 2000, pp. 62, 447 Note 23.
- ^ Price 1980, p. 27.
- ^ Early Radar Memories; Sgt. Jean (Sally) Semple, one of Britain’s pioneer Radar Operators Retrieved: 22 June 2008.
- ^ WAAF Wartime experiences Retrieved: 22 June 2008.
- ^ Uxbridge, 2001 Retrieved: 28 May 2008.
- ^ Price, 1980, pp. 22–27.
- ^ a b Ramsay 1989, pp. 14–28.
- ^ Ponting 1991, p. 131.
- ^ Price 1980, p. 26.
- ^ Pope 1995, pp. 63–65.
- ^ Air/Sea Search and Rescue, RAF history. Retrieved: 24 May 2008.
- ^ Bungay 2000, p. 68.
- ^ a b Orange 2001, pp. 96, 100.
- ^ Bungay 2000, p. 356.
- ^ Bungay 2000, p. 359.
- ^ Bungay 2000, p. 354.
- ^ Bungay 2000, p. 90.
- ^ a b c Halpenny, pp 8-9
- ^ Ramsay 1989, p. 552.
- ^ Ramsay 1989, p. 555.
- ^ Warner 2005, p. 255.
- ^ Warner, 2005.
- ^ Bungay 2000, p. 92.
- ^ a b Text of speech of 20 August 1940. Retrieved: 16 April 2008.
- ^ a b c Bungay 2000, pp. 203–205.
- ^ Price 1980, p. 179.
- ^ Deighton 1996, p. 182.
- ^ a b Putland, Alan L. "19 August - 24 August 1940." Battle of Britain Historical Society. Retrieved: 7 October 2007.
- ^ a b Putland, Alan L. "7 September 1940." Battle of Britain Historical Society. Retrieved: 7 October 2007.
- ^ Zaloga, p 15
- ^ Deighton 1996, pp. 188, 275.
- ^ Overy 2001, p. 125.
- ^ Overy 2001, p. 126.
- ^ Deighton 1996
- ^ Macksey 1990
- ^ Bungay 2000, p. 298.
- ^ Murray 1983, p. 52.
- ^ Overy 2001, p. 97.
- ^ Overy 2001, p. 98.
- ^ Wood and Dempster, 2003. p. 122.
- ^ Wood and Dempster, 2003. p. 117.
- ^ a b c d Taylor and Mayer 1974, p. 74.
- ^ Wood and Dempster, 2003. p. 193.
- ^ Bungay 2000, p. 306.
- ^ Irving 1974, p. 117: OKW War diary, 6–9 September 1940.
- ^ Hough and Richards 2007, p. 245.
- ^ Putland, Alan L. "7 September 1940 - The Aftermath." Battle of Britain Historical Society. Retrieved: 7 October 2007.
- ^ Putland, Alan L. "8 September - 9 September 1940." Battle of Britain Historical Society. Retrieved: 7 October 2007.
- ^ Irving 1974, p. 117.
- ^ Irving 1974, pp. 118–119. Sources: General Franz Halder and OKW War Diary for 14 September 1940. Keitel's notes, ND 803-PS, record the same.
- ^ Bungay 2000, p. 317: Refers to the 14 September meeting with Milch and Jeschonnek. Hitler wanted to keep up the "moral" pressure on the British Government, in the hope it would crack. Bungay had indicated Hitler had changed his mind from the day before, refusing to call of the invasion for the time being.
- ^ George VI & Elizabeth during the war years Retrieved: 30 June 2008.
- ^ Ramsay and Winston 1988, p. 90.
- ^ Churchill 1949, p. 334.
- ^ Battle of Britain 1940 This is sometimes erroneously believed to refer to the entire RAF.
- ^ Deighton 1996, introduction by A.J.P. Taylor, pp. 12–17.
- ^ Deighton 1996, pp. 172, 285.
- ^ Evans 2006
- ^ a b Harding, 25 August 2006
- ^ "The Most Dangerous Enemy (Arum, 2000)
- ^ Bungay 2000, pp. 394–396.
- ^ Evans, Richard J. "Immoral Rearmament". The New York Review of Books, No. 20, 20 December 2007.
- ^ The exact percentage was 28. The Luftwaffe deployed 5,638 aircraft for the campaign. 1,428 were destroyed and a further 488 were damaged, but were repairable (Hooton Vol 2. 2007, pp. 48–49).
- ^ Murray 1983, pp. 53–55.
- ^ a b Murray 1983, p. 80.
- ^ de Zeng et al Vol. 1, 2007, p. 10.
- ^ De Zeng gives a different figure of 247 fewer bombers(de Zeng et al Vol. 1, 2007, p. 10.)
- ^ Murray 1983, p. 53.
- ^ Price 1980, pp. 182–183.
- ^ Deighton 1996, pp. 266–268.
- ^ Bungay 2000, pp. 372-373.
- ^ Murray 1983, p. 56.
- ^ Foreman 1988, p. 8.
- ^ Speech to the House of Commons on 20 August 1940.
- ^ "Churchill's Island". NFB.ca. National Film Board of Canada. http://www.nfb.ca/playlist/its-oscar-time/viewing/Churchills_Island/. Retrieved on 2009-02-17.
[edit] Bibliography
- Allen, Hubert Raymond "Dizzy", Wing Commander, RAF. Who Won the Battle of Britain? London: Arthur Barker, 1974. ISBN 0-213-16489-2.
- Ansell, Mark. Boulton Paul Defiant: Technical Details and History of the Famous British Night Fighter. Redbourn, Herts, UK: Mushroom Model Publications, 2005. pp. 712–714. ISBN 8-389-45019-4.
- Bergström, Christer. Barbarossa - The Air Battle: July-December 1941. London: Chervron/Ian Allen, 2007. ISBN 978-1-85780-270-2.
- Bungay, Stephen. The Most Dangerous Enemy: A History of the Battle of Britain. London: Aurum Press 2000. ISBN 1-85410-721-6(hardcover), ISBN 1-85410-801-8(paperback 2002).
- Churchill, Winston S. The Second World War – Their Finest Hour (Volume 2). London: Cassell, 1949.
- Deere, Alan C. Nine Lives. London: Hodder Paperbacks Ltd for Coronet Books, 1974. ISBN 0-340-01441-5
- Deighton, Len. Fighter: The True Story of the Battle of Britain. London: Pimlico, 1996. Originally published: London: Jonathan Cape, 1977.) ISBN 0-71267-423-3.
- de Zeng, Henry L., Doug G. Stankey and Eddie J. Creek. Bomber Units of the Luftwaffe 1933-1945: A Reference Source, Volume 1. Hersham, Surrey, UK: Ian Allen Publishing, 2007. ISBN 978-1-85780-279-5.
- Dönitz, Karl. Ten years and twenty days. First Da Capo Press Edition, New York, United States. 1997. ISBN 0-306-80764-5
- Ellis, John. Brute Force: Allied Strategy and Tactics in the Second World War. London: Andre Deutsch, 1990. ISBN 0-8264-8031-4.
- Evans, Michael. "Never in the field of human conflict was so much owed by so many to... the Navy." The Times, 24 August 2006. Retrieved: 3 March 2007.
- Feist, Uwe. The Fighting Me 109. London: Arms and Armour Press, 1993. ISBN 1-85409-209-X.
- Franks, Norman Wings of Freedom: Twelve Battle of Britain Pilots (1980, William Kimber, London) ISBN 0 7183 01978
- Galland, Adolf. The First and the Last: Germany's Fighter Force in WWII (Fortunes of War). South Miami, Florida: Cerberus Press, 2005. ISBN 1-84145-020-0.
- Halpenny, Bruce Barrymore (1984). Action Station 4:Military airfields of Yorkshire. Patrick Stevens. Cambridge. ISBN 0850595320.
- Green, William. Famous Fighters of the Second World War. London: Macdonald, 1962.
- Harding, Thomas. "Battle of Britain was won at sea." The Telegraph, 25 August 2006. Retrieved: 25 August 2006.
- Holmes, Tony. Hurricane Aces 1939–1940 (Aircraft of the Aces). Botley, Oxford, UK: Osprey Publishing, 1998. ISBN 1-85532-597-7.
- Holmes, Tony. Spitfire vs Bf 109: Battle of Britain. Oxford, London: Osprey Publishing, 2007. ISBN 978-1-84603-190-8.
- Hooton, E.R. Luftwaffe at War; Blitzkrieg in the West: Vol. 2, London: Chevron/Ian Allen, 2007. ISBN 978-1-85780-272-6.
- Irving, David. The Rise and Fall of the Luftwaffe: The Life of Field Marshal Erhard Milch. Focal Point Publications. 1974. ISBN 978-029776-532-5[unreliable source?]
- Macksey, Kenneth. Invasion: The German Invasion of England, July 1940. London: Greenhill Books, 1990. ISBN 0-85368-324-7.
- Murray, Willamson. Strategy for defeat. The Luftwaffe 1935-1945 Air Power Research Institute. ISBN 1-585566-010-8.[1]
- Orange, Vincent. Park: The Biography of Air Chief Marshal Sir Keith Park. London: Grub Street, 2001. ISBN 1-902-304-616.
- Overy, Richard. The Battle of Britain: The Myth and the Reality. New York: W.W. Norton, 2001 (hardcover, ISBN 0-393-02008-8); 2002 (paperback, ISBN 0-393-32297-1).
- Peszke, Michael Alfred (October 1980 - volume=44, number 3). "A Synopsis of Polish-Allied Military Agreements During World War Two" (html at The Journal of Military History). Military Affairs: 128–134. http://muse.jhu.edu/login?uri=/journals/journal_of_military_history/v070/70.4peszke.html.
- Ponting, Clive. 1940: Myth and reality. Chicago: Ivan R. Dee, 1991. ISBN 978-1-56663-036-8.
- Pope, Stephan. "Across the Ether: Part One". Aeroplane Monthly, Vol 23, No. 5, Issue No. 265, May 1995.
- Price, Alfred. The Hardest Day: 18 August 1940. New York: Charles Scribner's Sons, 1980. ISBN 0-684-16503-1.
- Price, Alfred. Spitfire Mark I/II Aces 1939–41 (Aircraft of the Aces 12). London: Osprey Books, 1996, ISBN 1-85532-627-2.
- Price, Alfred. The Spitfire Story: Revised second edition.Enderby, Leicester, UK: Silverdale Books, 2002. ISBN 1-85605-702-X
- Ramsay, Winston, ed. The Blitz Then and Now: Volume 1. London: Battle of Britain Prints International Ltd, 1987. ISBN 0-900913-45-2
- Raeder, Erich. Erich Rader, Grand Admiral. Da Capo Press. United States Naval Institute, 2001. ISBN 0-306-80962-1
- Ramsay, Winston, ed. The Blitz Then and Now: Volume 2. London: Battle of Britain Prints International Ltd, 1988. ISBN 0-900913-54-1.
- Ramsay, Winston, ed. The Battle of Britain Then and Now Mk V. London: Battle of Britain Prints International Ltd, 1989. ISBN 0-900913-46-0.
- Robinson, Derek. Invasion, 1940: Did the Battle of Britain Alone Stop Hitler? New York: Carroll & Graf, 2005. ISBN 0-7867-1618-5.
- Taylor, A.J.P. and S.L. Mayer, eds. A History Of World War Two. London: Octopus Books, 1974. ISBN 0-70640-399-1.
- Weal, John. Messerschmitt Bf 110 Zerstōrer Aces of World War 2. Botley, Oxford UK: Osprey Publishing, 1999. ISBN 1-85532-753-8.
- Zaloga, Steven J; Hook, Richard (1982). The Polish army 1939-45. Osprey Publishing. ISBN 0850454174.
[edit] Further reading
- Books
- Bishop, Patrick. Fighter Boys: The Battle of Britain, 1940. New York: Viking, 2003 (hardcover, ISBN 0-670-03230-1); Penguin Books, 2004 (paperback, ISBN 0-14-200466-9). As Fighter Boys: Saving Britain 1940. London: Harper Perennial, 2004 (paperback, ISBN 0-00-653204-7).
- Brittain, Vera. England's Hour. London: Continuum International Publishing Group, 2005 (paperback, ISBN 0-8264-8031-4); Obscure Press (paperback, ISBN 1-84664-834-3).
- Cooper, Matthew. The German Air Force 1933-1945: An Anatomy of Failure. New York: Jane's Publishing Incorporated, 1981. ISBN 0-531-03733-9.
- Craig, Phil and Tim Clayton. Finest Hour: The Battle of Britain. New York: Simon & Schuster, 2000 (hardcover, ISBN 0-684-86930-6); 2006 (paperback, ISBN 0-684-86931-4).
- de Zeng, Henry L., Doug G. Stankey and Eddie J. Creek. Bomber Units of the Luftwaffe 1933-1945: A Reference Source, Volume 2. Hersham, Surrey, UK: Ian Allen Publishing, 2007. ISBN 978-1-903223-87-1.
- Fisher, David E. A Summer Bright and Terrible: Winston Churchill, Lord Dowding, Radar and the Impossible Triumph of the Battle of Britain. Emeryville, CA: Shoemaker & Hoard, 2005 (hardcover, ISBN 1-59376-047-7); 2006 (paperback, ISBN 1-59376-116-3).
- Foreman, John. Battle of Britain: The Forgotten Months, November And December 1940. Wythenshawe, Lancashire, UK: Crécy Publishing, 1989. ISBN 1-871187-02-8.
- Gaskin, Margaret. Blitz: The Story of 29 December 1940. New York: Harcourt, 2006. ISBN 0-15-101404-3.
- Goss, Chris. Dornier 17: In Focus. Surrey, UK: Red Kite Books, 2005. ISBN 0-9546201-4-3.
- Haining, Peter. Where the Eagle Landed: The Mystery of the German Invasion of Britain, 1940. London: Robson Books, 2004. ISBN 1-86105-750-4.
- Harding, Thomas. "It's baloney, say RAF aces". The Telegraph, 24 August 2006. Retrieved: 3 March 2007.
- Halpenny, Bruce Barrymore. Fight for the Sky: Stories of Wartime Fighter Pilots. Cambridge, UK: Patrick Stephens, 1986. ISBN 0-85059-749-8.
- Halpenny, Bruce Barrymore. Fighter Pilots in World War II: True Stories of Frontline Air Combat (paperback). Barnsley, UK: Pen and Sword Books Ltd, 2004. ISBN 1-84415-065-8.
- Halpenny, Bruce Barrymore. Action Stations: Military Airfields of Greater London v. 8 (hardcover). Cambridge, UK: Patrick Stephens, 1984. ISBN 0-85039-885-1.
- Hough, Richard. The Battle of Britain: The Greatest Air Battle of World War II. New York: W.W. Norton, 1989 (hardcover, ISBN 0-393-02766-X); 2005 (paperback, ISBN 0-393-30734-4).
- James, T.C.G. The Battle of Britain (Air Defence of Great Britain; vol. 2). London; New York: Frank Cass Publishers, 2000 (hardcover, ISBN 0-7146-5123-0; paperback, ISBN 0-7146-8149-0).
- James, T.C.G. Growth of Fighter Command, 1936–1940 (Air Defence of Great Britain; vol. 1). London; New York: Frank Cass Publishers, 2000 (hardcover, ISBN 0-7146-5118-4).
- James, T.C.G. Night Air Defence During the Blitz. London; New York: Frank Cass Publishers, 2003 (hardcover, ISBN 0-7146-5166-4).
- McGlashan, Kenneth B. with Owen P. Zupp. Down to Earth: A Fighter Pilot Recounts His Experiences of Dunkirk, the Battle of Britain, Dieppe, D-Day and Beyond. London: Grub Street Publishing, 2007. ISBN 1-90494-384-5.
- Olson, Lynne and Stanley Cloud. A Question of Honor: The Kościuszko Squadron: Forgotten Heroes of World War II. New York: Knopf, 2003. ISBN 0-37541-197-6. NB: This book is also published under the following title:
- Parry, Simon W. Intruders over Britain: The Story of the Luftwaffe's Night Intruder Force, the Fernnachtjager. Washington, DC: Smithsonian Books, 1989. ISBN 0-904811-07-7.
- Prien, Jochen and Peter Rodeike.Messerschmitt Bf 109 F,G, and K: An Illustrated Study. Atglen, Pennsylvania: Schiffer Publishing, 1995. ISBN 0-88740-424-3.
- Ray, John Philip. The Battle of Britain: Dowding and the First Victory 1940. London: Cassel & Co., 2001. ISBN 0-304-35677-8.
- Ray, John Philip. The Battle of Britain: New Perspectives: Behind the Scenes of the Great Air War. London: Arms & Armour Press, 1994 (hardcover, ISBN 1-85409-229-4); London: Orion Publishing, 1996 (paperback, ISBN 1-85409-345-2).
- Scutts, Jerry. Messerschmitt Bf 109: The Operational Record. Sarasota, FL: Crestline Publishers, 1996. ISBN 978-076-030262-0.
- Townsend, Peter. Duel of Eagles (new edition). London: Phoenix, 2000. ISBN 1-84212-211-8.
- Wellum, Geoffrey. First Light: The Story of the Boy Who Became a Man in the War-Torn Skies Above Britain. New York: Viking Books, 2002 (hardcover, ISBN 0-670-91248-4); Hoboken, NJ: Wiley & Sons, 2003 (hardcover, ISBN 0-471-42627-X); London: Penguin Books, 2003 (paperback, ISBN 0-14-100814-8).
- Wood, Derek and Derek Dempster. "The Narrow Margin: The Battle of Britain and the Rise of Air Power" London: Tri-Service Press, third revised edition, 1990. ISBN 1-854-88027-6.
[edit] External links
| Wikimedia Commons has media related to: Battle of Britain |
- Royal Air Force history
- Battle Of Britain Historical Society
- Battle of Britain in the Words of Air Chief Marshal Hugh Dowding (despatch to the Secretary of State, August 1941)
- ADLG Visits RAF Uxbridge Battle of Britain Operations Room
- British Invasion Defences
- Interactive map of UK Airfields and squadrons and Chain Home stations
- RAF Battle of Britain Roll of Honour
- Battle-Of-Britain Website in Dutch.
- Royal Engineers Museum Royal Engineers and Second World War (airfield repair)
- Battle of Britain Memorial
- Shoreham Aircraft Museum
- Tangmere Military Aviation Museum
- Kent Battle of Britain Museum
- "Sounds Historical" - Radio New Zealand archive recording of Sir Keith Park (scroll down to 10:50 am, 25 April 2008).
- Battle of Britain from the German perspective (Lt Col Earle Lund, USAF): Pdf file
- The Falco and Regia Aeronautica in the Battle of Britain
- Spitfire Pilots, articles about Spitfire pilots
| Aerial Defence of the United Kingdom during World War II |
|---|
| Overview Documents |
| Royal Air Force | Royal Canadian Air Force | Strategic bombing | Night fighter |
| Prominent People |
| Hugh Dowding | Charles Portal | Cyril Newall | Trafford Leigh-Mallory | Keith Park | R V Jones | Sholto Douglas | Robert Watson-Watt |
| Organisation and units |
| No. 10 Group RAF | No. 11 Group RAF | No. 12 Group RAF | No. 13 Group RAF RAF Fighter Command | RAF Balloon Command | AA Command Women's Auxiliary Air Force | Royal Observer Corps | Eagle Squadrons | Battle of Britain Airfields |
| Campaigns and Operations |
| Kanalkampf | Battle of Britain | The Blitz | Baedeker raids | Operation Crossbow |
| Aircraft, Technology and Tactics |
| Hurricane | Spitfire | Bolton-Paul Defiant | Mosquito NF | Bristol Beaufighter | Hawker Tempest | Gloster Meteor |
| Chain Home | AI radar | "Battle of the Beams" | Barrage balloon | German V weapons | Big Wing |
| Other |
| RAF strategic bombing offensive | USAAF | Luftwaffe | Hermann Göring |
|
||||||||||||||||||||||||||||||

|
||||||||||||||

